
Motorcycle lighting is one of the hottest topics on webBikeWorld.
That means increasing light output, improving visibility, LED brake lights, turn signal brightness, wheel lights and other lighting novelties.
You name it — if it has to do with lights and brightness, then motorcycle owners are interested.
I’d like to think that most of this interest springs from a sincere desire to take the Hurt study conclusions to heart.
That is, improvements in motorcycle visibility will help reduce one of the leading causes of motorcycle accidents: the “I didn’t see it” crash.
While it’s important to have good frontal visibility to wake up oncoming traffic during the day, lighting is crucial when the sun goes down. More is always better when it comes to nighttime headlight power and quality.
If you ride after dark you know how lame most stock motorcycle headlights can be just when you need them most. Wherever you ride, improved lighting is crucial.
City riders can always use more precisely focused beam patterns to help light the way through all of the distractions.
And suburban or country road riders need a heavy “throw weight” and anything that provides advanced deer warning. If light quality and output can be drastically improved AND the new lights make the bike look better at the same time, I’m betting most riders will be interested!
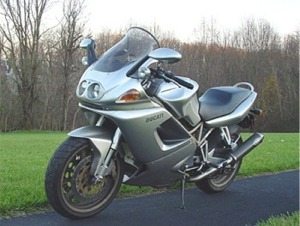
Ducati’s ST line of sport-tourers is a good example.
A sleek bike with a look that will still be contemporary 5 years from now (not necessarily true for some other Ducati designs!), but its stock headlight can definitely use some more muscle.
And it’s probably one of the weaker design elements of the bike (not improved on the ST3, in my opinion!).
Part of the reason for the stock Ducati headlight’s weak throw is the design of the headlight lens, and also because the wiring that feeds juice to the lights is about the thinnest gauge that can be used without melting the insulation.
It always pays for the electrons to have a direct and beefy path from the power station to the filament.
And the ST also has more than enough connectors, relays and other assorted bits between the battery and the bulb to bleed off juice, which doesn’t help things either.
The upgraded Ducati Designs harness uses a pair of 14 gauge wires for each light that run directly from the battery (the fuse-holder connection is 10 gauge).
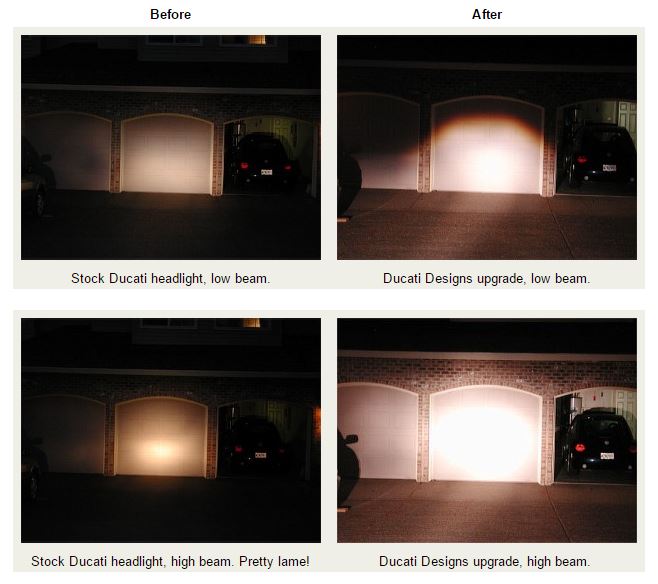
Stock ST headlights measure about a 1.5V drop from the battery to the low beam with the original wiring.
The luminous intensity drops considerably when the operating voltage of headlamps is below 100% voltage (13.5 volts).
95% voltage (12.8 V) gives 83% luminous intensity, 90% voltage (12.15 V) gives 67% luminous intensity, 85% voltage (11.48 V) only gives 53%.
The H9 bulb in the Ducati Designs upgrade produces approximately 2100 lumens at 13.2V, compared to about 1300 lumens from the H3 and H1 bulbs.
Considering the original wiring’s typical voltage drop, that puts the luminous output of the upgrade at roughly 2.5X the original setup. And the Ducati plastic reflector and lens designs produce a terrible pattern to boot.
Details
Enter Paul Geller and Ducati Designs. Some may question the business model of designing and manufacturing a headlight replacement for a relatively niche model; let’s face it, Ducati doesn’t sell 80,000 ST’s per year, so you’re probably not going to retire on the headlight replacement profits.
But Paul decided that he had a better idea, and unlike most of us, he acted on it.
The result is a beautifully designed and executed lighting replacement for ST owners that dramatically improves both the quality and output of the ST’s headlights and makes the bike look better and a bit meaner and more modern.
The price may be seem a bit high, but the difference in output and the quality of the product seems worth it the first time you throw the switch.
You probably spent as much on that carbon-fiber exhaust, and all that does is make more noise!
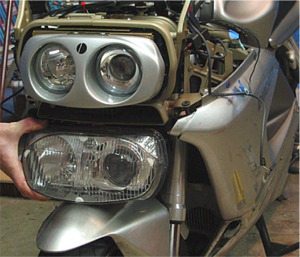
The Ducati Designs ST headlight replacement is available painted in your choice of factory colors.
The paint on our example perfectly matched the silver metallic color of the test ST2. By the way, the headlight unit is also available in right hand drive versions for the U.K. and other countries.
When all is said and done, replacing the stock ST headlight isn’t technically difficult.
By far the hardest part is removing and then replacing the tightly fitting Ducati fairing. It’s my understanding that more than one X-rated invective has been tossed Ducati’s way during an ST fairing removal, and I can see why.
Installation
The Duc you see in these photos was generously served up as a test mule by Bob S. of the Mid-Atlantic Ducati Owners club.
And as a first-time ST fairing stripper, the first thing I can say that if I owned one, I’d be in the market for a Dzus fastener replacement kit ASAP!
Ducati Designs works with several Ducati dealers in the U.S.A. who sell and install the light, and any Ducati dealer should be able to install one for you with no problem.
But if you’re handy with a wrench, and you have the patience, Ducati Designs’ website has adownloadable .pdf file with detailed instructions to step you through the installation process.
The document includes photos, and Paul is in the process of developing a DVD-based video to help make the job even easier.
It’s a good idea to carefully read the instructions and walk yourself through the entire process before starting.
I became a little confused during certain steps and had to re-read the instructions several times to understand what came next, but that may be because I’m not that familiar with the way the ST is put together.
The basic idea is to remove the upper fairing and the right side fairing; install a new and high-quality wiring harness that goes from the battery to power the new light assembly; and remove the old light and install the new one.
There’s a bit of drilling involved to attach the two relays that power the new light, and a couple of electrical connections to be made, and that’s about it.
Ducati Designs’ instructions have been developed and improved over time, and they include several tips from owners.
The only suggestions we could add are that we think it’s easier to loosen all the wiring for the stock headlight.
And then do everything up to the point of physical removal of the headlight and the instrument cluster before disconnecting the headlight wiring from the bulbs and the speedometer cable.
Wiring Harness Notes
I would also emphasize that the wiring harness should be fed in from the left side of the bike, behind the headstock, before it’s connected to the battery.
This is mentioned in the instructions, but somehow I missed it.
It’s much easier to feed in the battery end of the wiring harness from the left than it is to try and push the majority of the harness up through the frame from the right.
It would be nice to have a few more photos detailing the exact placement of the harness.
That’s because if you haven’t done it before it’s a bit of a guessing game to understand which way to lay it so that it won’t interfere with the forks when the bike is turned. But this is a minor quibble…
We probably got a bit carried away by using several more cable ties than were supplied in the kit to make sure everything was tied down nice and snug, although the four that were supplied are enough if used per instructions.
Other than that, we removed the upper fairing “ears” and put them in a vise to drill them for the supplied pair of relays.
I used a 3/16″ bit as directed to drill the holes, and then used a 3/8″ to just touch the edges of the hole for a quick deburring.
This worked well, and most any size drill bigger than 3/16″ can be used to do this if you don’t have a deburring tool.
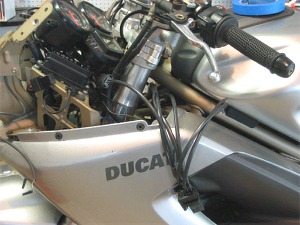
The four blue Posi-Lock connectors worked great in this application. The wires are pulled forward in this photo for identification. NOTE: This ST has modified wiring to accommodate a pair of PIAA auxiliary lights, so your wiring will look different. See the wBW review of Posi-Lock connectors for more information.More Connections
We also did not use the 3M Scotchlok (.pdf file) connectors which were supplied in the kit to connect the original bulb leads to the new relays.
I really like using Posi-Lock connectors for this type of electrical work, because they’re easy to use and provide a very secure connection.
And they’re also removable, re-usable, and easy to splice in more wires if you’re adding additional electrical accessories to the bike, which is a real plus.
This makes it easy to connect all of the wiring first to make sure everything works correctly and to rearrange the wiring if necessary before snugging everything up.
Although the 3M Scotchlok connectors are high quality devices, as are most of the products that 3M manufactures, I still like to be able to prototype everything first and the crimp connectors are non-reusable.
Also, the Posi-Lock connectors make it much easier to remove and replace the headlight if you decide to sell your ST.
Note also that each of the 3M Scotchlok connectors can connect two pairs of wires, so if you use them, you’ll have an extra pair of holes that can be used to tap into the power and ground in case you’re adding another device to the bike.
Oh, and one more thing: don’t forget to install the 20-amp fuse that’s supplied in the kit before you test your new lights!
I wore some hair out after scratching my head trying to figure out why nothing worked, until I discovered I had forgotten to install the fuse!
Performance
I only got to do some of the wrenching; Bob gets to ride the ST! Here are Bob’s comments regarding his new lights:
The Ducati ST series has a stock headlight system that obviously is a descendant of British royalty; that of Sir Lucas, Prince of Darkness.
Comparing the same bulb from the stock Ducati lens assembly in another motorcycle revealed that the Ducati lens is part of the problem, even after the improvement that an internal washing provided.
If you own a Ducati, realize that the stock gauge of the wires allow virtually no tolerance for replacing the bulbs with higher wattage bulbs.
You may get away with installing higher-output bulbs for a while, but the higher amperage can create enough heat to almost certainly melt the stock reflector and may ultimately destroy the wire insulation.
Replacement of the stock Ducati wiring with a heavier gauge demonstrated that the thin stock wires had enough built-in resistance to also reduce the amount of light produced by the headlights.
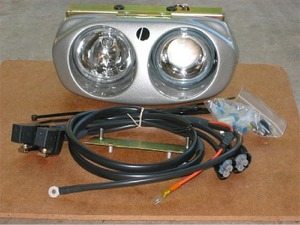
The Ducati Designs headlight assembly consists of a Hella reflector and lens paired in a custom fiberglass, steel and aluminum shell that is designed to replace the entire headlight assembly of a Ducati ST-series motorcycle.
The Ducati Designs headlight uses standard H9 bulbs that are hands-down brighter than stock, and replacements are relatively easy to obtain.
The Ducati Designs assembly came with a high-quality pre-manufactured wire harness assembly, in a heat-shrink package that included the relays.
It is easy to appreciate this nicely integrated package for anybody who has tried to properly put a harness together with the correct wire sizes, hardware, and relays.
Ducati Designs’ instructions are detailed and the installation is straightforward.
Any problems that arise are mostly due to the removal of the Ducati’s tight fairing. The Ducati Designs wiring harness is a bit long, but that could be accommodated. I was impressed by the paint match and that the Ducati logo is a subtle touch.
This was not planned to be a comparison test, but it worked out that way (see below for before/after photos!).
The test bike, a ’99 ST2 arrived with replacement wiring of a heavier gauge for the stock lights and an auxiliary set of first-rate PIAA Model 004XT “Ultra-White” lamps that were mounted at the base of each mirror.
The ultra-white PIAA lamps blew away the stock Ducati high-beam.
More importantly, the wide distance between the extra lights increased conspicuity for oncoming cars, much like the 3-light set-up on many Harleys.
A flash of the high beam with the extra lights was enough to get the attention of anybody who was semi-conscious.
In addition to the increased range, extra lights provided a wider field of light that provided not only conspicuity for cars, but also illuminated the eyes of road-side deer.
However, the two lights in the Ducati Designs assembly provided nearly all of this, plus gave substantial additional distance.
The stock Ducati low-beam, even with heavier wiring, was no match for the low-beam in the Ducati Designs headlight assembly.
To remain legal, the Ducati Designs low-beam is still a single bulb that is not too offensive and it can get lost in day-time reflections and traffic.
However, the light is a crisper white at night than the stock light, providing better forward illumination and some improvement to the sides.
The improvement to the low-beam seems insignificant when you hit the high-beam switch! Your world changes! Momma-Mia!
The Ducati Designs combination of the Hella assemblies with the intensity of the H9 bulb creates a tunnel of light on dark country roads. Imagine having portable streetlights that run in front of the bike and you’ll get the idea.
It is hard to imagine traveling fast enough at any reasonable speed to go beyond the tunnel of light.
Plus, the high-beam in daylight is intense enough to stand out from background traffic and grab attention from most, not all, cage drivers who want to pull into your path.
If you really want to go all-out, the PIAA and Ducati Designs lights are complimentary.
The PIAAs give better peripheral vision at night and are a positive addition if deer are a concern or you want max conspicuity. However, any set of lights beat a single light for increasing your conspicuity to cars who are in front of you.
Conclusion
What the Ducati Design light assembly gives is an increase in conspicuity in the day-time and then it provides a tunnel of light at night that would be hard to outpace. Isn’t that what you want?
| wBW Review: Ducati Designs Ducati Headlight | |
|---|---|
| Manufacturer: Ducati Designs | List Price (2004): $550.00 |
| Colors: Paint color matched. | Made In: U.S.A. |
| Review Date: February 2004 (?) | |
Owner Comments and Feedback
See details on submitting comments.
From “C.D.”: “It was great to finally read what every Ducati Designs customer already knows… These lights rock!
I wanted to use aftermarket lights like the PIAA system but hated the way they looked, hey it’s a Ducati.
After having my local shop install the Ducati Designs light system I can finally see at night. Paul did a super job on the whole package and should get a standing ovation.
They really do make a significant difference, and the cost isn’t much more than a high quality bolt on package. I’m always asked about them and gladly refer them to the website.
Oh BTW Paul also offers a nice / clean GPS mounting system for the ST’s.”