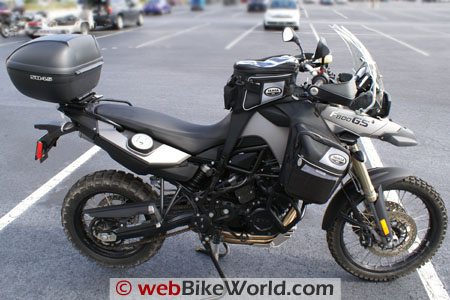
Despite my raving over my F800GS in Part One, nothing is ever really perfect, right?
With this mental deception plan put into place last fall, about an hour after picking up the small GS, it was time to start looking at how it could be tailored and enhanced.
As I have discovered over the past year there was a growing list of accessories – from BMW , the major accessory suppliers and a whole raft of other players who are taking advantage of the growing ‘adventure touring’ market.
Many of the products coming to market for the F650 and F800GS twins show great innovation and simplicity of design, things I really appreciate.
Some of the best seen so far for these models are from some of the smallest players and many of them are based here in North America.
Since getting the 8GS in early October of 2008 and having now racked up just under 4500kms during the fall and two treks down south, the mental list continues to grow, so some prioritization is required.
Some items translate into a hard accessory while others get addressed through a simple adjustment or minor modification to something.
So after a few months of ownership, some enjoyable work and an ever-growing outlay of cash, the motorcycle is slowly being tailored and accessorized.
What follows is a round-up of the efforts completed as of end-February 2009.
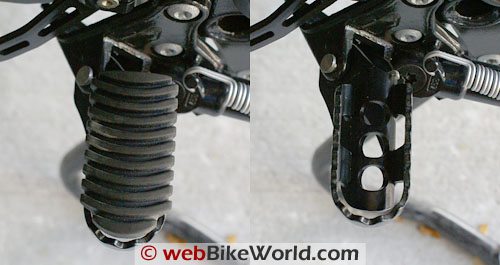
Foot Pegs
Before leaving the dealership the rubber covers were pulled directly off each foot peg – they are obviously meant to be removed as desired.
Doing so reveals the preferable (at least for me) cleated surface that provides far more grip both on and off road, adds about 5mm of leg space between pegs and seat and, looks way more gnarly.
GPS (for finding my way home)
I finally got the opportunity to use a mounting kit procured almost a year ago directly from Powerlet.
This kit is specific for the Garmin 2720 and 2820 GPS units and contains everything needed — a plastic frame that holds the Garmin securely, a dual lead combination power and audio harness and the necessary RAM handlebars components to mount it all up.
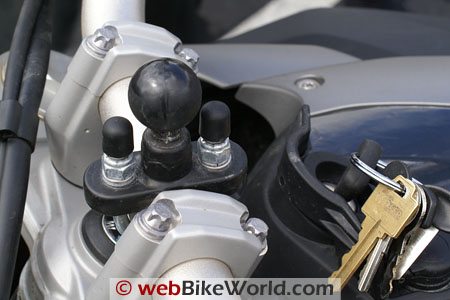
The handlebar mount was installed just to left of centre between the handlebar clamps with the ball oriented almost vertical.
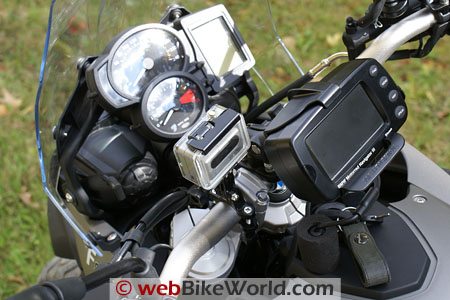
With the provided back plate and ball component mounted to the plastic frame, the Garmin 2820, removed from the BMW Navigator III+ cradle, can be snapped into place – it will latch in between raised mouldings.
While the kit included a medium length arm, a short arm was originally used to join the two ball mount components together although I now use a RAM variable swivel arm – each half of the arm pivots independently.
The power and audio harness is about 12 inches in length which for use on the F 800 GS is just about perfect.
As the DIN accessory plug is located to the left of the ignition, the whole installation is simple and uncluttered.
The 2.5 mm socket on the second lead of the combination harness allows a headset to be plugged in or connected directly via a 2.5 to 3.5 mm adapter to my StarCom Digital system or any other desired input so that the GPS audio can be heard wired up.
The GPS is angled up to provide easy viewing, except when direct sunlight hits the LCD of course. There is sufficient motion with the short arm to allow angle adjustment to suit light or rider orientation – sitting or standing, but the variable swivel arm provides more overall adjustment.
The whole installation sits just slightly behind and above the left handlebar clamp, pretty much lined up with the handlebar itself.
In this position is does not interfere with the bars, cables, the ignition or accessory plate are and only just touches the tank bag when the bars are turned full lock.
The parts used for this installation were: Powerlet 2820 PowerMount with RAM Mount (diamond base, and one inch handlebar kit) and PN PBK-001; RAM PN RAP-B-200-12U, Variable Swivel Arm.
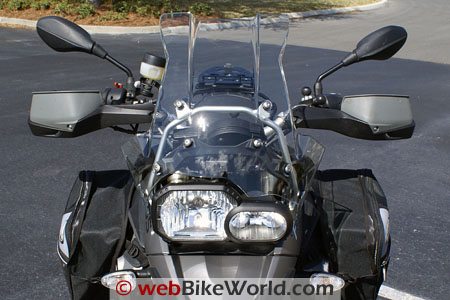
Hand Guards
Based on an eyeball assessment, it appeared that the revised (facelift) hand-guards found on the ‘08 R1200GS Adventure would be a close fit on the F800GS.
A related posting on a forum provided some impetus to try them but the final incentive was generated by the encroaching cold weather.
The hand-guards are easy to remove from the Adventure. Loosen and remove the 10mm end bolts and then the bar mounts; a simple clamshell secured with a single 4 mm bolt.
Make sure the outer recess ring, hand-guard and end-weight pieces are put up somewhere safe while the work is proceeding.
An initial lash-up was done by mounting the GSA hand-guards on the F800GS using the F800 stock bolts, the outer recess rings from the GSA assemblies, the left and right hand-guards and finally, the F800 bar end weights, which are shorter in length than the GSA component.
With the pieces sitting in place, the right hand or throttle side guard was almost a perfect fit and just cleared the right hand control assembly and brake housing.
The bar clamp sits a bit closer to the assembly, but it still fits over the bar and can be tightened down easily.
Because there are noticeable differences between the Adventure and the F800GS clutch lever assemblies, the left side mounting effort took a few minutes longer to complete.
In the end, an expedient workaround was realized; reversing the bar clamp lines everything quite well.
This puts the bolt head on the bottom with the clamp half sitting on top.
The final clearances needed to align the bar clamp hole in the hand-guard with the actual bar clamp assembly was provided by using a 10mm plastic spacer with a 6mm hole to bridge the gap.
This increased offset necessitated the use of a 25 x 4mm bolt.
With everything in place and tightened up to specs, the hand-guards are well secured, look good, and best of all, provide the intended protection.
I have looked at two other third-party hand-guard kits but between availability and cost issues, it was more expedient to order another set of the new R1200GS hand guards and install them on the Adventure – done and done.
The hand-guards are BMW Part: Hand Protector, Facelift Models, PN 71 60 7 705 221-BMW
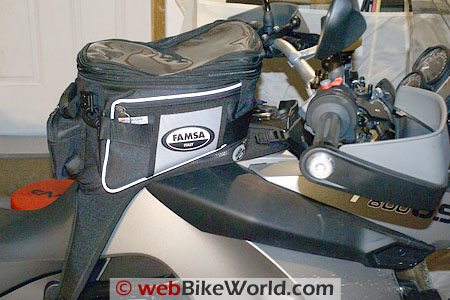
FAMSA Tank Bag
Shortly after taking delivery of the F800GS and knowing that a FAMSA 244/58 model tank bag was being produced specifically for the new GS, I ordered one.
Around mid-November the bag arrived, packed in a plain brown box, with no instructions (none are needed).
Simplicity itself, the tank pad and bag were installed in under ten minutes…the most time consuming activity is mounting the back connector harnesses to the frame tubes on the left and right sides.
As expected, the tank pad and bag fit perfectly.
The tank pad has a large V-shaped notch cut out of the front to provide a contoured fit with the raised ignition/accessory plate that forms part of the dummy panel.
With the tank bag zipped in place, it is still an easy matter to access the ignition and accessory plug, even with the GPS mounted.
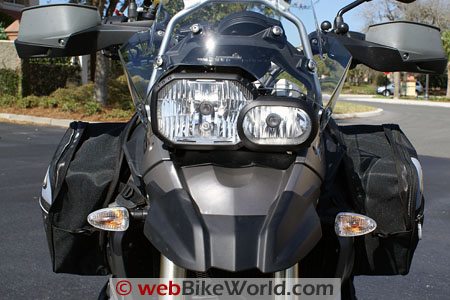
The FAMSA Tank Pannier Experiment
Never content with the status quo, I was curious as to whether FAMSA was going to produce a tank pannier variant, similar to the other kits in use.
It seems that if properly positioned so as to not interfere with the flow-thru vents on the side panels, a set of tank panniers would be a valuable addition to the cargo carrying capacity of the 800.
Upon being advised that a tank set was not likely imminent, I set about to see if one of my current sets of tank panniers could be adopted, having already gone through the exercise with the Versys.
I had two sets available – one with short sleeves from an original GS set and one with longer sleeves from a DL-1000 tank set that had seen duty on one of the Adventures.
In any case, the longer sleeve tank panniers, when positioned approximately where they would connect to the tank pad, were almost ideally located on the F800GS….
After taking some pictures, the whole thing got put aside for a couple of months.
With a longer trip to Florida looming as opportunity to evaluate more stuff, a hasty sketch of a dummy-tank-panel pad was drawn up and faithfully produced in ballistic nylon by Eric, a fellow GS rider.
Eric’s rendering was laid across the dummy tank panel and each side pannier zipped to its mate that he had sewn on to the home grown pad – et voilà! Within another hour and in adopting a generic strapping approach, again similar to that used for the Versys installation, the test set was securely mounted.
The setup works well.
I have repositioned the bags forward just a bit more to provide more clearance between the inner wall of the tank panniers and the edge of the side panel, keeping a good stream of warm air moving off the radiator and out the side vents.
I knew it was important to keep that air flowing….my legs were nice and warm during the cool late evening runs back from Daytona, but getting pretty toasty in the +20C temperatures we had over the final few days.
The temperature gauge on the GS never moved however, so I the current positioning will work well.
A snap-in accessory vent kit is now available for the F800GS and from looking at the pictures of them in place, they might serve double duty: to better direct the air flow and, force more clearance between the side panels and the tank panniers.
Once the vent kit has been procured, I will provide further feedback.
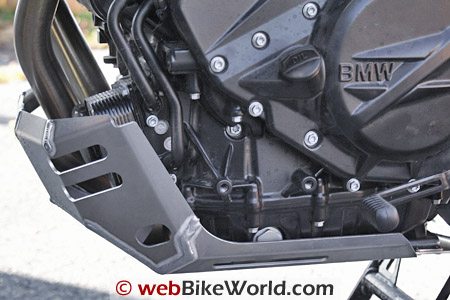
BMW Enduro Aluminum Bash Plate Engine Guard
As identified in Part One, the original bash plate is quite small although made of thick nylon. It is strong and would likely absorb a lot, but coverage is not its strong suite by any means.
The oil filter is left exposed at the lower front — not a good thing, given what the F 800 GS is capable of traversing.
The stock item is held on in plate fashion with four double-ended cushion bolts that thread into the bottom of the engine.
The bolt components help in absorbing blows in cushioning the plate, and if the plate is subjected to an extremely heavy blow or pressure, the bolts will shear off. Replacements parts are available
Removing this component takes a couple of minutes with the right Torx sockets in hand.
I cleaned all the mounting hardware off at the same time — it is truly amazing how much crud hides up under the bash plate, which is why this area should be cleaned out on a continuing basis and not just at service intervals.
Compared to another after market bash plate that I had seen, the BMW Enduro aluminum bash plate is huge.
It is made out of thick aluminum, with a high angled front surface to protect the oil filter and other fittings on the lower front of the engine.
The pass-through holes line up perfectly and the plate sits on the cushion pieces of the bolt component when everything is installed and tightened up.
This is a quality piece and actually less expensive than most of the other bash plates on the market. Bolting the new bash plate on took less than time than removing the original unit.
This piece already bears a few scars, testament to its silent but continuing service since being installed.
Other than a minor conflict with the right side GIVI engine guard that is easily remedied for the longer term, the only other change will be to paint it with something durable or have it powder-coated.
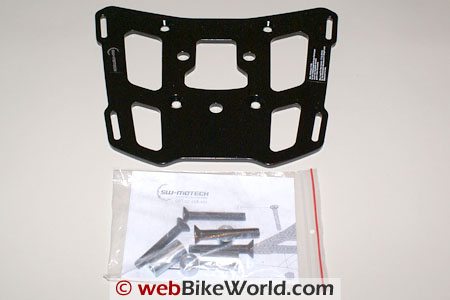
SW-Motech ALU-RACK Kit
First up of the shiny black lightweight aluminum pieces was the SW-Motech ALU-Rack similar to its brethren that I have installed on other Beemers.
This plate rack, when installed with the Quick-Lock (cam-lock fasteners and receivers) allows various luggage adapters to be mounted or removed in seconds.
A small flat blade screwdriver is needed to lever up the two plastic caps that cover the two hand-grip mounting bolts on the back of the GS.
With a T45 socket remove the two forward 8 x 35 mm and rear 8 x 15 mm Torx bolts. Use the bag the kit parts came in to hold the bolts and the two plastic caps for safe keeping – they are not reused for this installation.
Take the four spacers from the kit and set the two 16 x 12 x 8mm components in the front mounting points and the two 16 x 32 x 8mm items in the rear mounting points.
These spacers provide level mounting points for the rack plate.
As I have three Quick-Lock adapter plates to use (soft luggage rack, GIVI and SHAD top case plates), the Cam-Lock hardware that comes with each plate kit needs to be installed onto the ALU-Rack before bolting it to the four mounting points.
This is done by browsing the instructions and then securing the three Cam-Lock pieces onto the appropriate spots on the underside of the rack, using the small Phillips-head self-tapping screws.
As with any installation, I use a medium thread-locker compound on all mounting hardware.
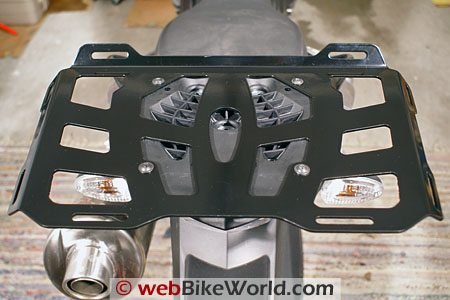
Flip the plate over and mount it to the GS via the four mounting points using the 8 x 55 mm (50 mm thread) bolts that come with the kit and tighten them down to 23 Nm, per the instructions using a T30 socket.
Note – the replacement bolts are relatively soft so use the T30 socket carefully – make sure it is well seated before tightening the bolts.
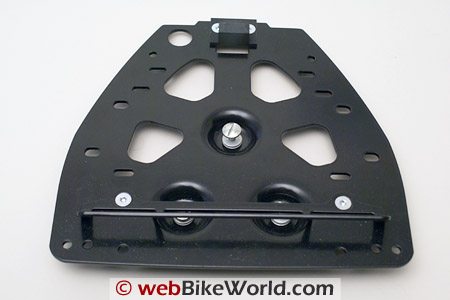
SW-MOTECH Quick-Lock Adapter Plate for Soft Luggage
This kit is comprised of the aluminum luggage rack and the plastic adapter plate that is mounted to the ALU-Rack via the three Cam-Lock fasteners used for the Quick-Lock system.
This lightweight assembly is great for strapping on duffel-style bags or something like the Marsee Zipp bag.
To start, align the luggage rack with the four mounting holes in the adapter plate and secure the two together using the four M6x16mm bolts and the M6 lock nuts, with 4.5 Nm of force.
With these two components fitted together, push the whole assembly into the cut-out on the rack and push down firmly. Tolerances are close, so it will be a snug fit the first few times until it gets worn in.
With the bottom surface of the assembly sitting flush as possible on the rack, take a large flat-blade screwdriver and carefully twist the three Cam-Lock fasteners clockwise until they lock into the Cam-Lock receivers mounted on the bottom of the F800GS rack.
Given tolerances the fasteners are usually difficult to secure initially, but lining them up and putting some pressure on the tops with the screwdriver will get them seated properly.
If the fasteners just will not work, do not use excessive force as the Cam-Lock receptacles can be forced out of shape.
If everything lines up and locks into place, the three pieces will be one very secure assembly. All that is needed is some appropriately sized luggage, along with some Rok straps, large or small, for securing whatever to the rack.
The cut-outs and slotted angled edges provide lots of spots to mount straps, bungee cords or baling twine.
The two piece assembly is very light weighing only 1150 g or 28.5 oz. (1.78 lbs.), so adding this to the rack itself which weighs 1.5 lbs adds just over 3 lbs. to the back end so far.
SW-MOTECH Quick-Lock Adapter for SHAD Top Cases
Having four SHAD top cases (review) on hand, three of which could be used with this adapter plate, I was quite curious to see this (relatively) new component from SW-Motech in action.
Removing any of the other adapters is a ten second effort and with the ALU-Rack ready to receive, it was time to try the SHAD top-case adapter.
As received, the assembly was pretty much ready to go; the Cam-Lock fasteners, rear top case clip and front carrier bracket were already installed on the aluminum plate.
Observation One – the carrier bracket or front top case carrier bracket actually covers the two front Cam-Lock fasteners, which kind of defeats the purpose of having the quick-release assembly.
In this situation, removing the adapter would require unbolting the carrier bracket first.
While removing this bracket with its two M6 x 12 bolts and 10 mm locking nuts underneath is not a big deal, a simple change in the design of the bracket would alleviate this issue. This should have been addressed before final production.
Some might class this as a minor thing, but it ruins the whole intent of the Quick-Lock system — adding or removing adapters in seconds.
In talking to the Twisted Throttle staff, it became evident that a revised part is being produced by SW-Motech (listed on their website) but none are yet available in North America.
However, the vendor has ordered some of the updated items.
With the offending piece removed, all three Cam-Lock fasteners can be utilized as intended to mount or remove the adapter in a few seconds. Re-installing the carrier bracket is another two minutes or so.
TThis raises Observation Two about the kit – the stock bolts are too short, they should be at least 15mm in length to facilitate a washer and the self-locking nuts. Luckily I had the needed length bolts on hand.
With the second observation addressed, the third one reared its head. In attempting to test fit one of the SHAD top cases, the snap fitting clip on the adapter plate would not engage the latch on the case — everything appeared to be 0.5 to 1.0 mm out.
This is the same issue encountered with the original SHAD installation effort…
With having corrected the previous instance without much fuss, I chamfered out the back holes by 0.5mm rearward and also cleaned out the front holes that secure the carrier bracket.
With the clip and carrier mounting bolts loosely secured to allow some initial flex, the top cases would latch properly.
With a few more minutes spent in cleaning up the holes and then tightening the mounting bolts to the specified 9.6Nm, all three cases would latch smoothly onto the adapter plate.
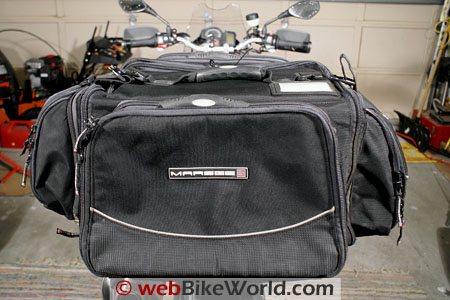 The Marsee Zipp Bag
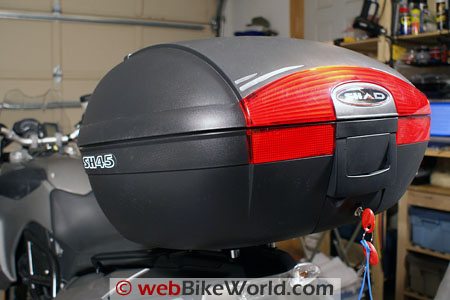 SHAD Top Case
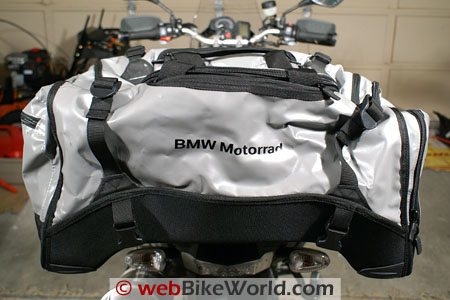 BMW Motorrad Tail Bag
 Cargo Carrying Options
Since day one I had been using my faded but still very functional 50 litre Marsee ZIPP bag strapped across the rear tail section.
With the FAMSA tank bag pretty much filled with the basics, the Zipp bag carries just about everything else needed for day or weekend jaunts, including the camera bag.
During the trip to Virginia over Christmas I (finally) picked up a 51 litre BWM Motorrad tail bag that has the hard shaped bottom. It is a bit more weatherproof than the Zipp (even with its rain cover) and fits the F800GS perfectly.
Around the same capacity of the Zipp it is more rectangular in shape and function and is proving to be a welcome addition to the luggage options.
With the ALU-Rack installed and three adapter plates on hand, I can now mount up the V46 GIVI trunk, three SHAD (40, 45 and 46 litre) top cases, or the wide luggage rack that accommodates the Marsee Zipp, the BMW 51 litre Motorrad bag, virtually any duffel on hand, or a pile of wood when needed.
For securing strap-on loads, large and small ROK straps are pretty much all I use any more although the odd bungee cord will get used now and then in an emergency.
But they have a tendency to allow heavy loads to shift so are not the best solution.
The ROK straps, and similar items, can be mounted to almost anything. Their strength with limited elasticity gives them great versatility and I have never had one fail yet.
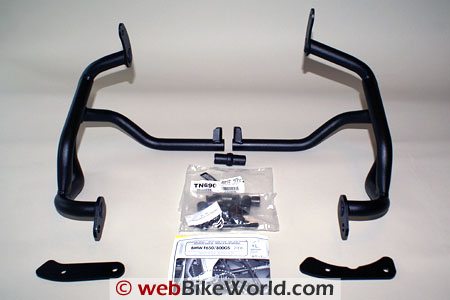
GIVI TN690 Engine Guard Kit
With a number of engine guard kits on the market for the F800GS, ranging from $200.00 to just under $1000.00, choice is not an issue.
But availability is, so when the one of the top end sets I was after could not be sourced and based on feedback from another local 8GS owner, I decided to order in a set of the GIVI guards.
So far it has been a good decision. I got the last kit held in stock by the Canadian distributor, so the old price was applied vice the new-year pricing and I saved the exchange differentials and cross border fees as well and got the kit in two days.
The usual heavy plastic wrapped GIVI package consists of the left and right guard components, a hardware bag with all the necessary adapters and fasteners and the usual poorly written and only slightly less poorly illustrated instructions.
I will state again, “providing proper documentation and good visual guides is something that should not be an issue in this day and age.”
With a thin flat blade screwdriver remove the left and right side plastic side caps that cover the recessed engine frame mounts, just ahead and below the small side covers.
The caps are not reused, so put them in a bag with all the other OE parts for safekeeping.
Next mount up the left and right expansion assemblies. Put one of the expanding tube inserts and threaded cone together and push the assembly into each of the left and right side engine mount frame recesses.
Each engine guard piece is then set in place.
This is done by threading an M8 x25mm bolt through the top guard mount and tightening it slightly, so the expansion assembly begins to tighten up inside the recess. A 13mm socket or wrench is needed for this task.
The pieces only need to be secured enough to hold them in place.
While the instructions identify leaving the engine guard sleeve installation until the end, I recommend inserting the sleeve into the left and right tubes at the front junction at this point in the installation process.
This is easily done at this stage and it helps keep both side guard pieces aligned during the rest of the installation.
As well, if you have the large BMW or another type of large bash plate installed, it might need to be removed or loosened to allow the engine guard side pieces to be tightened up.
With the large BMW Enduro aluminum bash plate, the upper right hand corner will touch the edge of the right engine guard.
After continued use, no problems have been seen with the two pieces touching.
But the next time the bash plate is taken off, likely soon, for servicing and cleaning, I am going to remove a small corner piece of the bash plate so the two components don’t put pressure on each other.
Anyway, this effort was going quite well until I went to tighten the left front lower mounting bolt, an M8 x 30mm item. After threading it in by hand and using the socket, it would not tighten up – Oh! Oh!
I removed the bolt, along with the left side guard and discovered that the first three threads on the engine mount had literally broken out. Fortunately there is about 30mm of thread depth available.
With the threads cleaned out and everything sprayed with WD-40, I used a longer M8 x 45mm bolt (a surplus item from another GIVI kit) and torqued it down carefully.
I suspect part of the problem is that the supplied kit bolt is too short.
At 30 mm in length, there is only about 5mm of thread left to actually thread in and bite – probably not enough strength, in my humble opinion.
So, what’s next? Well, how about the front cross tube junction that uses a M8 x 35mm Allen head (6mm) bolt. Both the bolt and the welded nut that it threads into are very soft, so I cheated a bit and applied less than the torque stipulated in the instructions. With the usual medium thread-locker applied, it is still good and tight.
Total time taken, including remounting the bash plate, was about 2.5 hours, including a coffee break that allowed me to warm up as well…even with rugs down, the floor is still cold in the dead of winter, even the garage was a balmy 10C.
Another fall project looms on the horizon.
The GIVI guards are a wee bit different than most of the other guards available. They flare out wider at the front and are actually wider than the foot pegs.
This feature should provide increased protection to the machine and rider as there is more clearance to absorb a hit or pressure from the side or front edge. On the other hand they do not provide any higher side protection, i.e., for the radiator, as some systems do.
Conclusion
To date all the installed accessories are working as touted or intended and nothing has broken or come loose, yet.
With a new riding season in front of us and with more excursions off-road and longer trips, everything will get put to the test even further.
Other than the usual poor installation instructions from one or two suppliers, quality has been good and all the kits contained just what was needed and in some instances, extra or optional pieces that were appreciated.
A few more items have been installed since the end of February and other pieces are on the way, while some other major components are still on the wish list, but the season is young.
The next installment will tentatively allow an update regarding installations and feedback on how everything is working.
More: BMW F800GS Specifications and Information
See Also: BMW F800GS Review Part 1 | AltRider Headlight Guard F800GS | AltRider Crash Bars F800GS
Master Listing of All wBW Motorcycle Product Reviews
Owner Comments and Feedback
See details on submitting comments.
From “E.M.” (November 2013): “In your article, you mention the depth of the bolt not being sufficient.
As a tool maker / mold maker/ machinist for the last 40 years (holy crap! am I that old?), it is standard practice to count on 1-1/2 times the diameter of the bolt used for thread depth.
Therefore; when using a 1 inch diameter bolt, you would want to torque it at 1-1/2 inches deep. Great information on the F800GS.”
From “M.T.” (July 2012): “Just read your article on the F800GS with the Givi engine guard and BMW skid plate. You had mentioned that the two touch? Is this an install issue or just how the two are designed?
You said your going to remove a small piece of the corner on the skid plate, do you mean cutting it off to fit?
Reply From H.B.C.: The simple Givi engine guard works well, but depending on fitment, the large BMW skid or bash plate can touch in the upper front corner on the right (curb) side.
I’ve now done three installations of these two accessory components, but the first one done on the test mule F800GS was the only one where the fit between the two caused them to actually touch.
I never did cut a small piece out of the skid plate, but when it was removed for servicing once, I just anchored the plate and bent the upper edge out a bit, which served to provide the desired clearance when it was reinstalled – issue solved.
However, some extra effort in grinding down the edge or cutting a small piece out would provide even more clearance between the two components and it is much easier to modify the skid plate than the mounts or tubing of the Givi guard pieces