
NOTE: See important update regarding recommended oil viscosity (below) | New information added regarding the oil pickup screen below
We often rant about motorcycle owners who bring their rides to the dealer for the most basic maintenance tasks rather than doing it themselves.
The ranting has boxed me into a figurative corner, so to speak, when it comes to maintenance on my own bike.
So I’m calling my own bluff (is that possible?) by personally taking on the all-important first maintenance task on the GT1000: the 600-mile oil and filter change.
After looking things over, I figured that an oil and filter change on a Ducati GT1000 should be a relative piece of cake and it is, but there are some issues that I discovered which made me yearn for the guidance of a good shop manual — you know, the one that doesn’t yet exist for the GT1000?
Without it, I am basically flying blind on any and all maintenance or customization projects. And since the GT is such a new-to-the-market bike, there isn’t much in the way of help that can be offered by my fellow GT owners either.
When my heart bought the bike, my brain wasn’t thinking about a shop manual. But since I’m an inveterate tinkerer (my wife was ready to have me committed on more than one occasion after I purchased a new motorcycle and proceeded to completely tear it apart in the garage to make sure it was put back together according to my QC standards), it sure would be nice to have some written guidance that at the very least would inform me of the correct torque settings for the many nuts and bolts.
Never one to fear a job that might necessitate the purchase of new tools, and in the interest of science, I dove right in.
GT1000 Oil and Filter Change
The GT1000 uses the same 1000DS (dual spark), two-valve, air-cooled engine found on several other Ducatis, including the Multistrada 1000, the Monster and, of course, the other Sportclassics.
I could probably buy the shop manual specific to one of those bikes, which would at least provide a minimum of information about the shared engine, but I’ve been holding off, hoping that the GT1000 CD-ROM based shop manual will become available sooner, rather than later.
I must confess that I did get some basic information via a couple of pages from what appears to be a Haynes shop manual, faxed over by a fellow Mid-Atlantic Ducati Owner’s Club member. The pages describe the basics of a 1000DS oil and filter change, and they indicate that in addition to changing the oil filter, the tubular-shaped oil pre-filter screen that should also be removed and cleaned at each oil change. More on that in a bit…
One of the nicest things about changing the oil on the GT1000 (and, I assume, all of the other Ducati models using the 1000DS engine) is that the oil filter hangs right out in the open on the bottom of the engine on the right-hand side.
Whether this exposure helps or hurts the off-road pretensions of the Multistrada, I don’t know. Actually, I guess one could say that maybe the oil filter doesn’t hang right out in the open, but the top 1/8 or so of the filter hangs out enough to grasp and remove.
Easy, that is, if you have the right tool for the job, which brings us to problema numero uno.
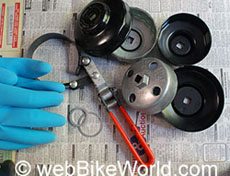
Oil Filter Wrench
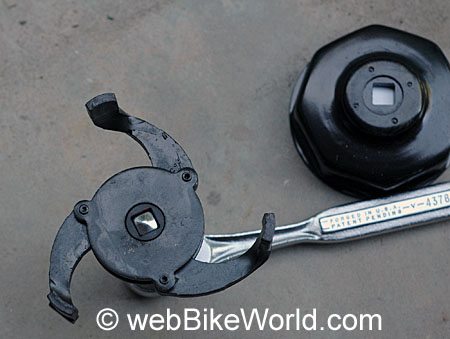
Of course, of the 5 different oil filter hex end cap oil filter removal tools I have collected over the years, not a single one would fit the strange Ducati 74mm diameter oil filter with the eight-sided hex top.
I searched all over, looking for a tool that would fit, but without success. I ended up using a modified version of the “universal” oil filter friction band grip tool (don’t know what else to call it; it’s the tool with the orange handle in the photo above) I had on hand.
A few days later, I did find the correct hex end cap tool at Pro Italia for $10.95, which seems like a slightly exorbitant price, but I suppose it’s not bad actually, considering the rarity of the thing.
Ironically, it’s labeled “Made in USA” by a company called Vector, part number 17030. I have not been able to find a company called “Vector”, even when searching through the Thomas Register, but I did discover that this oil filter wrench (and possibly the same oil filter) is commonly used by Moto Guzzi owners.
If anyone knows of another source for this oil filter wrench, please drop us a line at the email address noted at the end of this page. UPDATE: see suggestions for oil filter wrench sources in theVisitor Comments section below.
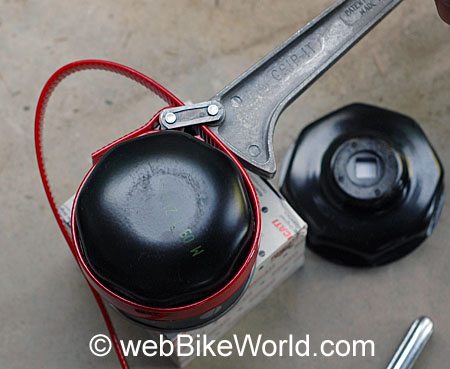
In any case, the small diameter metal band grip wrench shown above actually works fine — in fact, I’ve now discovered that for gripping, removing and installing the new filter, the band grip wrench works better than the Ducati hex cap tool (photo directly below). It’s also pretty much the only tool that will fit on the original factory larger-diameter filter, because the thin band of the strap easily fits between the filter and the engine casing that surrounds 7/8 of the filter body.
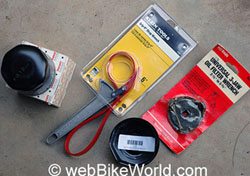
By the way, don’t forget the rubber gloves! I use the heavy-duty, pre-formed type found at Home Depot, but mine recently wore out and I’m using these el Cheapo dishwashing types (photo above), found in the local grocery store, until I can replace them with a better pair.
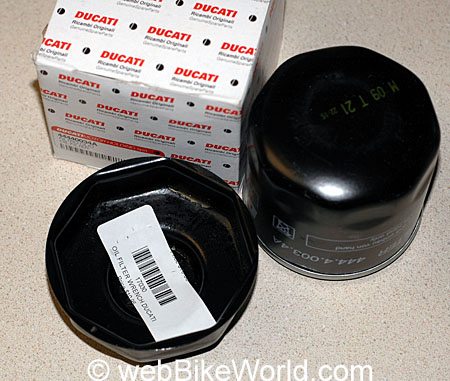
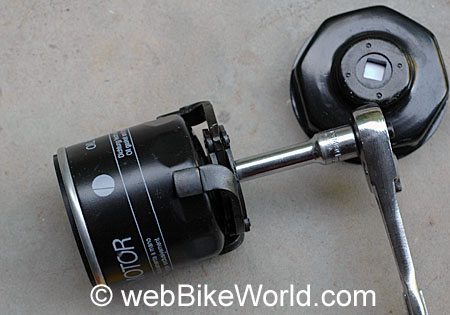
Ducati 4A filter and special filter end cap removal tool.Let me explain this issue of the “fat” vs. “skinny” oil filters a bit, because it’s yet another puzzling Ducati idiosyncrasy that I suppose supports one of the charms of ownership.
Apparently, the oil filter that is installed on this engine at the factory is a Ducati part number 444.4.003.2A. But I’m told that the 2A is only installed as original equipment and is not available for purchase at a Ducati dealership; instead, the 444.4.003.4A is the correct replacement.
Both have 8 flats on the hex, but the 4A is noticeably smaller in diameter (74mm across). I don’t know the diameter of the original 2A because I threw it out before I realized this was an issue. There is more room between the filter and the recess in the engine case when the 4A is installed — enough room, in fact, that I thought I had the wrong oil filter and had to call the dealer to make sure.
This difference is only noticeable at the first oil change, and if the owner has the oil changed at the dealer, he or she will probably never realize that there is a difference in the two filters. Curious… So the thin metal “universal” band grip wrench is actually the best tool for the initial job, as it fits between the original “fat” 2A filter and the filter recess.
But the problem with this strap wrench is that it lacks traction — it slips easily around the outside of the painted Ducati filters as I’m trying to loosen or tighten it. This is a problem I have always experienced with that tool on any oil filter I’ve ever tried it on, car or bike. The solution is a piece of emery cloth, which I wrap around the inside of the metal band between the band and the filter body, which provides traction for the band as it is tightened on the oil filter.
The “correct” Ducati hex end cap tool also has problems. It has a flange around the edge that makes it difficult to fit in the small space between the oil filter and the filter recess in the engine case, especially on the 2A oil filter that came with the bike, which is thicker than the 4A replacement.
The advantage of using a hex cap type tool is that it has a 3/8″ square drive, which allows a torque wrench to be used to correctly install the filter back on to the engine. But since I didn’t have a manual that told me the correct torque value anyway, I ended up using the old hand-tight-and-a-bit-more method.
Klein S-6H Grip-It oil filter universal strap wrench.By the way, while I was looking for the correct oil filter wrench, I also found a couple of others that work. The Klein S-6H Grip-It universal strap wrench (6″, part number S-6H) shown in the photo directly above is also made in the U.S.A. and it fits the smaller diameter, 4A Ducati oil filter.
It has a grippy rubber-like strap, but all the pressure is put on the tip of that pot-metal handle against the oil filter body, so this wouldn’t be my first choice to unfasten a stuck filter, because I think all that pressure on one point might collapse the filter.
K-D Tools 3-Jaw Universal Oil Filter Wrench works only one way: to remove the filter, but not replace it. Another oil filter wrench that works is the KD Tools Universal “3-Jaw” wrench, part number 3288, which expands from 2.5″ to 3.75″. It has three arms that grip the filter and the more torque that is placed on the wrench, the tighter it grips. This wrench is usually available or can be ordered in a local auto parts store. Note that it will only remove the filter, it does not spin the other way, i.e., clockwise, to screw the filter back on!OK, enough about the oil filter wrenches, let’s get down to business.
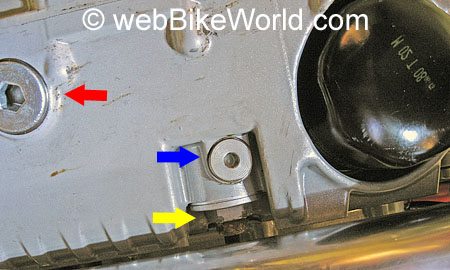
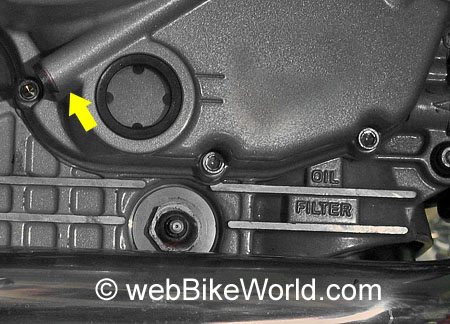
The oil drain plug under the engine uses a 10mm Allen wrench, sometimes referred to as a “hex key”. This plug, indicated by the red arrow in the photo directly above, requires a crush washer, which must be renewed whenever the plug is removed.
The photo above also shows the space between the oil filter, in this case the narrower 4A, and the engine case, looking up from underneath the engine. The yellow arrow indicates the cover for the oil screen, which is supposed to be removed and cleaned at each oil change. More on that later…
The blue arrow indicates another drain plug; I’m not sure what this one does, I assume it drains the chamber with the oil screen (Note: see visitor comments below). I did not remove this plug, but if it is removed, it appears to have a crush washer also.
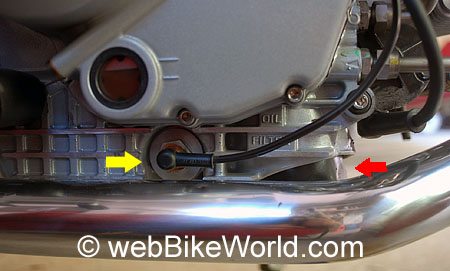
Here’s another photo (directly above), looking at the right side of the engine. The oil level window can be seen and just below it is a yellow arrow, indicating the hex cap for the oil screen. The wire is attached to the tip of the hex cap and is easily removed. I think this wire sends information about the oil temperature up to the dashboard.
Oil Pickup Screen
It’s obvious from this photo that the oil screen hex cap is difficult to access on the GT1000. The right side exhaust pipe is in the way. I could not fit a box wrench or open end wrench up in back of the exhaust pipe to access the hex cap, which I believe is either 21mm or 22mm, relatively rare sizes for motorcycle fasteners.
If Ducati had only lowered the exhaust pipe by about a tiny 1/8″, a socket could fit over the hex cap, but noooo….
I tried dropping the exhaust pipe by loosening the 10mm nuts that hold the pipe on to the front cylinder. This allowed me to fit a 12 point, 22mm socket on to the hex cap, but either the socket is not the correct size or the 12 points don’t provide enough grip and/or the hex cap metal is very soft AND it’s really torqued down tight, because the socket immediately slipped and bunged up the corners of the hex.
[UPDATE: “The size of hex head to remove the oil screen on the Ducati 900 is 14 mm. I found a socket type with a half-inch drive extension is the best way to remove it.” From “S.B.”]Since I don’t have the shop manual, I don’t know how much torque to use on the 10mm exhaust pipe nuts, but they came off rather easily, so I didn’t overdo it and will check them again once I learn the correct torque values.
At that point, I gave up and I have since ordered 20mm, 21mm and 22mm deep six-point sockets and will try again next time. I’ve asked around but no one seems to have the answer to removing this cover, so if anyone can provide any insight into this, please contact me via the email address at the bottom of this page.
By the way, the dealer sold me a special crush washer for this cap also, and he reminded me that the screen should be removed and cleaned at each oil change, so this is, apparently, an important maintenance item.
This is (ironically I suppose) one of those reasons why I’d rather do it myself than leave it up to an unknown mechanic. I’d rather run into these problems and figure out a way to get them resolved because — and I apologize in advance if I offend anyone — I just don’t trust that a shop mechanic will take the time and energy to successfully resolve these type of challenges.
The double irony is that I didn’t successfully resolve it myself, but I now understand what is required to fix it and I will resolve the problem by the next oil change, of that you can be sure. I’d rather take the extra time to fix the problem, unlike the owner who uses a shop to change the oil and both the owner and the mechanic may not even be aware that this problem exists or they may never get it successfully resolved.
In this case, if the screen really does collect large bits of metal before they get to the filter, I want to make sure the screen is cleaned and not to assume that the job has been done correctly. The lesson here is that if you don’t change your GT1000’s oil yourself, make sure you ask the servicing mechanic some questions about the filter screen issue and the answers will either make you feel comfortable that the job was done correctly or not.
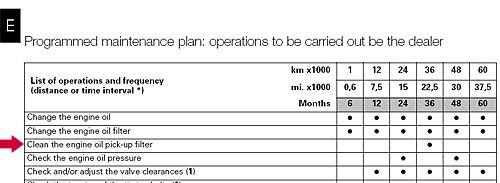
Update on Oil Pickup Screen
A visitor wrote “I just called my dealership (DeSimone Ducati/BMW/Victory) and they said I should definitely not be cleaning the screen on my own and it only needs to be done, at the most, every 12,000 miles. Your thoughts?”
Interesting…. It’s my understanding that the screen (or “oil intake mesh filter”) should be cleaned at every other oil filter change. Here’s the information taken directly from the Multistrada shop manual, Section D4, page 14; that bike has the same 1000DS engine:
“Every two oil changes, clean the oil intake mesh filter.
Unscrew the outer plug (3) with seal (5). Unscrew the screws (B) and remove the guard (A) before proceeding. Remove the spring (D) to release the horizontal exhaust pipe mouthpiece, unscrew the screws (E) and remove the pipe (F) from the balance pipe (G). Release and withdraw the mesh filter (4). Clean the mesh filter with gasoline and compressed air. Care must be taken not to break the filter mesh.
Refit the mesh filter (4) and its seal (5) on the plug (3) and tighten to the specified torque (Sect. C 3). Remove the filler plug (6) and fill with the recommended oil (Sect. C 2). Fill until the oil reaches the MAX mark on the sight glass. Refit the filler plug (6).
Run the engine at idling speed or several minutes. Check for oil leaks. Check that the oil pressure light on the instrument panel switches off several seconds after the engine has been started. If this is not the case, switch off and trace the fault. Switch off the engine and allow several minutes for the oil to settle. Check the oil level and top up to MAX mark, if necessary. Refit any parts you have removed.”
But I went back and checked the GT1000 owner’s manual, page 64 in the English language section, which claims that the “engine oil pick-up filter” only needs to be cleaned once every 22,500 miles or 36 months:
If anyone has more information on this subject, please let me know. Possibly the Multistrada’s screen needs to be changed more often because the bike could be used in harsher environments?
Oil Change
I removed the oil drain plug, which came out without drama. The faxed pages I had indicated that the drain plug has a magnetic tip which attracts metal filings, and some metal should be expected. Here’s a close-up of the plug; the metal filings can be seen attached to the magnet.
This doesn’t bother me and is expected for a brand-new engine on its first oil change. But this also stresses the importance of changing the oil and filter (and the pre-screen) at the correct intervals.
I cleaned off the filings by spraying them with carb cleaner, which has a powerful stream and also evaporates quickly. The magnet actually slides up and down on the copper-colored tube seen at the tip of the plug on the left-hand side in the photo below, which means it’s important to direct the carb cleaner spray up underneath the magnet to make sure everything is good and clean.
 Torque Values
Once the oil was drained, I replaced the crush washer with a new one and torqued the drain plug to the correct values of 42Nm (range of 38-46Nm, or 28-34 ft. lbs.) as indicated in the owner’s manual (yes, this information is in the GT1000 owner’s manual).
By the way, the correct value for the oil screen hex cap is apparently 45Nm (33 ft. lbs., with an acceptable range of 28-34 ft. lbs.). Be aware that I’m not 100% confident in these numbers; if anyone has better intelligence on this, please forward it to me at the email address at the end of this article.
All I can say is — be careful! It’s better to sneak up on the correct torque setting by using 3-4 lower and intermediate settings while feeling for signs of over-tightening or stripping. It’s way, way too easy to strip the aluminum threads on a motorcycle.
One more torque value that I got from somewhere is for the oil filler cap at 5Nm (range of 5-6Nm or 3.6-4.4 ft. lbs.). While I was changing the oil, I replaced the cap with a way-too-expensive aluminum billet cap from Pro Italia; see the GT1000 blog for photos and information.
Let’s see — what else can I say? After draining the oil and replacing the drain plug with new crush washer, I removed and replaced the filter, remembering to put a thin coating of oil over the rubber gasket before installing the new filter.
The Ducati Multistrada 1000DS shop manual lists the following torque values:
| Part | Thread (MM) | Nm (Tolerance ±10%) | Notes |
|---|---|---|---|
| Oil cartridge filter | M 16×1.5 | 11 | Engine oil on seal |
| Oil filler plug | M 22×1.5 | 5* | |
| Oil drain plug | M 22×1.5 | 42 | |
| Oil mesh filter | M 22×1.5 | 42 | |
| * “Critical point for dynamic safety. Tightening torque tolerance must be: ± 5% Nm.” | |||
By the way, I also filled the filter as much as I could with fresh oil prior to installing it. This helps prevent oil starvation when the engine is first started after the oil change.
The GT1000 owner’s manual says that the 1000DS engine takes 3.9 liters (3,900 cc’s or 4.12 quarts of oil. I did not measure how much oil came out of the engine (warmed up, of course), but I could only get 3.5 liters (3,500 cc’s) back in. The first 3 liters went in with no problem and filled the sight glass half-way, but after leaving the bike for about 20 minutes, I was able to pour in another 500cc’s. I suppose that the other 400cc’s are up there in the oil cooler.
On the old BMW Airheads that are equipped with an oil cooler and thermostat, there’s an entire procedure and special tool to drain the cooler. I wonder if this is also the case with the Ducati; perhaps that other drain plug underneath the screen hex cap will drain the oil cooler?
There’s also a tube-shaped tunnel with a hex bolt and washer on the end that is located just above the sight glass. This tube is indicated by the yellow arrow in the photo below. Perhaps this drains the oil cooler? Again, if anyone can provide intelligence on this, please forward it to the email address at the end of this article.
And that’s about the size of it. Lots of information here, but this is to be expected for the first oil change. I’m sure the next ones will be easier. When I figure out the oil screen hex cap problem, I’ll report back with an update.
By the way, what oil did I use? The owner’s manual recommends a variety of oil weights, centered around good ‘ol 10W40 non-synthetic. Believe it or not, I’m not very fussy about motorcycle oil, believing that any decent oil is fine, as long as it’s changed at the intervals recommended in the owner’s manual.
Let’s face it: the vast majority of motorcyclists run maybe a couple thousand miles per year, so any decent oil will protect the engine for about seven eternities. In any case, I usually use BMW oils (made by Golden Spectro) when I can, because the local BMW dealer is nearby and supposedly BMW oil is good stuff. I used the basic BMW 10W40 on the GT1000 and will continue to do so.
Oil Cross Reference
A visitor asked if we could put together a cross-reference list for the Shell Advance lubricants that are recommended in the GT1000 owner’s manual. While doing some research, I discovered that the Shell Advance Ultra 4 oil that Ducati recommends on page 149 is a fully synthetic motor oil! The owner’s manual says nothing about using synthetic oil on page 140, where it lists the capacities on the “Checking the oil level” page.
This is obviously a bit confusing, but if Ducati is recommending Shell Advance Ultra 4 (which is apparently not distributed “officially” by Shell in the U.S.A.), then a substitute would be a 10W40 or 15W50 fully synthetic oil. BMW (Golden Spectro) makes a fully synthetic 15W50 that I will use from now on.
The table below compares the Ducati recommended Shell Advance lubricants to possible substitutes in the U.S. market. If anyone has more information regarding this topic, please forward it to us at the email address at the end of this article. Shell also has a special “Shell and Ducati Road Bikes” page that may be of interest to Ducati owners.
By the way, I contacted Shell to ask if they had a suggested substitute for Shell Advance Ultra 4 in the U.S.A. and this is the reply I received: “Unfortunately, there are no US replacements from Shell for the Shell Advance oils. We suggest checking with a Ducati dealer to determine acceptable US-available replacements.”
| Type | Ducati Recommendations (Owner’s Manual, page 149) |
Possible Substitutes |
|---|---|---|
| Engine Oil | Shell Advance Ultra 4 (Synthetic) | BMW or Golden Spectro Platinum Full Synthetic |
| Brakes/Clutch | Shell Advance DOT4 | DOT4 Brake Fluid |
| Fork Oil | Shell Advance Fork 7.5 or Donax TA | Spectro Golden Cartridge Fork Fluid 7.5W (125/150 is 7.5W) |
| Contact Cleaner | SHELL – Advance Contact Cleaner spray for electric systems | Strike Hold Electrical Contact Cleaner Spray (Used by U.S. Military) |
More on Oil Types
See my update on using Motul Synthetic oil for oil change #2 (on the Blog page). It’s expensive, but seems to decrease oil temperatures significantly, while keep them in a more stable range.
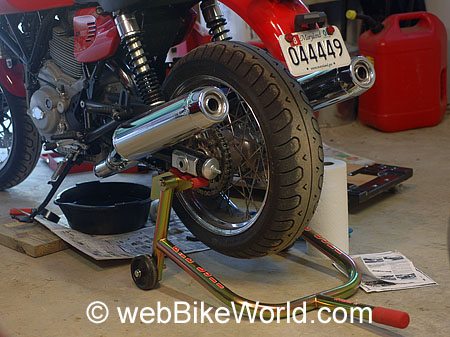
In the meantime, here’s one more photo: this job was made much, much easier with the help of the Pit Bull rear stand (webBikeWorld review) for the GT1000 and Sportclassics.
Publication Date: October 2006
Owner Comments and Feedback
See details on submitting comments.
From “G.M.” (November 2012): “Thanks for the great oil change info – very helpful, as is all the info I’ve found on this blog so far.
After doing my first change, to avoid the filter hassle I recommend using a K&N filter, which has the 17 mm nut on the top making it easy to spin on with either a regular or socket wrench. It also has numbered position markers that tell you when you’ve tightened it enough. And being K&N, it’s a quality filter. The filter number for the GT is KN-153.”
From “J.G.” (January 2012): “Thanks for all the hints and reviews – it helped me a lot to come to a final decision – and I bought a 09 GT 1000 eight weeks ago. After 20 long, long years without a motorbike I’m now back in heaven – although Germany is really cold and ugly in December/January.
I just want to add something to the article “Changing the Oil and Filter – Ducati 1000DS Engine”. You tried to find a nut to open the oil screen, and finally you bought several new ones. But is it thinkable that you already had one in your toolbox, because it seems to be a “normal” spark plug nut? They tend to be quite long.
Maybe I’m wrong, but when I hear “approx. 21 or 22 mm” I always think on this spark plug nut … Perhaps this can help to save some money for your reader. Again, thank you for your site, I like it a lot!”
From “M.M.” (03/11): “About emptying the oil cooler, I do not believe it is necessary, it is draining automatically when you change the oil filter, because the cooler output is to the filter. Without changing the filter there is an airlock and most probably pump, cooler, filter and lines are left full of old oil. Then you might turn the engine a few rounds with starter, to get more oil out.
This is based on my experience on MTS1000, don’t know if all DS1000 engines are the same. In the MTS DS1000 engine all oil is primary pumped through the cooler. Cooler output is to the oil filter input.
When you remove the filter, oil will flow from cooler down. Input side is coming from the pump, but it is not full airlock I think.
There is so called oil cooler bypass valve in the filter base which enables oil to bypass a potentially frozen (!) oil cooler directly to the filter, and to my eye that valve is not fully airtight. It is only limiting the flow so that most oil is going through the cooler.
To make sure you get also pump empty, turn the engine a few rounds with starter if you want really clean oil.”
From “J.W.” (10/09): “I just read your article and for comparisons sake the oil change on a 2001 Monster 900 is almost identical, (there is no oil temp sensor on the screen) except the header runs under the engine and out of the way, not beside.
One of the first changes I made was to start using K&N’s oil filter for this bike as it has a 17mm nut (pre drilled for safety wire) on the top (bottom?) of the filter. For an extra couple bucks a filter you don’t have to get a new socket or fiddle around with strap style wrenches and can easily torque the filter to spec.
I always wondered why a 30 year old engine design putting out a modest 80 horsepower and running a dry clutch required the latest greatest expensive full synthetic oil, but then again it is a Ducati.”
From “C.I.” (8/09): “Hi there, thanks for putting up this info. I Just finished changing my oil on my 2007 Sport 1000. Here’s the information I’ve found out.
In Canada, Kawasaki full synthetic is made by Mobil 1 and 15w50 sells for half the price of BMW oil. I cleaned the oil screen and used the following: 21mm hex long socket to remove the cap, and then found out that the inner screen needs an ½ inch extension bar and a 14mm hex key to remove it just like on the 696 oil change video on YouTube. I also torqued them back in at 42 Nm.
All three oil change components have the same torque setting. I confirmed that the parts were the same using Ducati Omaha’s online parts diagrams, excellent site for figuring things out, with all the part numbers.”
From “Ducati Dave” (6/09): “Thanks for the article (with good photos) of this oil change. This past weekend, I tried to tackle the change on my 2007 Sport 1000. The access cap (21 mm) for the oil screen, was handled by an American SAE 6 point deep well socket 11/16 (I think) after miking the inside of the hex, it worked just fine.
The steel hex on the end of the screen, was handled by the same Snap On hex bit I used on my ’99 M900 front axle. The oil filter is cooked on, and the screen hex was like it was welded in (at first).
Going back with the screen, I used a smear of anti-seize on the threads and torqued to 42 nm, (my value). I use 20/50 Mobil V-twin (oil) in my Ducatis. Thanks Again!”
From “R.R.”: “Reading these articles is always fun. I had a few ideas to pass on … First when I bought my first Ducati in 1994 one of the first things I bitched about was the socket Allen style drain plug and the uncommonly sized hex on the oil strainer. Also the recessed nature of the oil filter.
All of these things have been problems going back 15 years. My oil filter wrench of choice is the one that is like a slip ring pair of pliers with big round serrated grippy jaws, common in a lot of Auto parts stores. Beats the old drive a screwdriver through it to get it off.
I am surprised to this day that no one has tackled the oil strainer in the aftermarket. Almost every part you can think of someone has tried to improve upon for Ducatis except that oil strainer. Drain plugs been fixed with standard hex head designs in nice precise aluminum. The socket head is a POS, and if you are not careful easy to have slip and bugger it up. Just like that oil strainer hex.
I believe that is actually a coated brass, it just looks like steel or aluminum. The worst thing that can happen is the fit into case is tight, I actually had the plastic strainer piece get stuck and it pulled off the metal end and it was quite a feat to retrieve it from the cases. Oh the cussing and gnashing of teeth that accompanied that job will go down in history as my finest black hour.
Amazing how so few things have changed in the world of Ducati considering how many things have changed, like 1098R. You would think some of these minor details would have gotten worked out by now. Clearly Ducati does think about these things as evidenced by the detail that goes into some of their fasteners.
Still in other areas it is like we have been doing this for 20 years let’s just do it for another 20. Ducati does have a pretty interesting range of tools, from the high tech to the cobbed together at the last moment welded sockets to combination wrenches. So likely there is a special wrench for that oil strainer. Unfortunately.
R.R., current owner of 2001 996R.”
From “D.M.”: “Thanks to your blog site I was able to attain valuable information regarding the GT 1000 oil change and related matters. Just a few quick observations and a question:
I found that the correct size deep-well socket to remove the nut / thermistor assembly in order to clean the screen mesh filter was a 21mm. I was also able to do this without loosening the exhaust pipe. Once the assembly was removed to expose the mesh filter, I was unable to remove the filter for cleaning. It appears this filter is threaded and screwed in place with removal done by loosening with a hex key. My question to you and anyone who might have knowledge concerning this matter is: What size hex key does it take to remove the screen mesh filter ?
The drain plug is removed by using a 10mm hex key. I was able to install almost 4 quarts of oil for the change. Again, thanks for the valuable info.”
Editor’s Reply: Interesting – I wonder if Ducati changed the location or bend of the exhaust pipe on later models to allow easier access to the mesh filter? I don’t know what size hex key is used for the filter, I’ll ask at the dealer.
From “D.S.”: “I appreciate the trouble you have gone to in making all of this information available. I would like to add the following tip in the interests of cooperation: While it is well worth getting new aluminum oil drain plug washers as they are quite cheap, if you forget or if the dealer isn’t nearby, you can reuse the old ones if you anneal or soften them. When used once, they are compressed and hardened and will not conform to the seal surface. You need to heat the seal with a torch, and let it then cool off slowly. This softens the metal, allowing it to be reused. Don’t heat the seal too much or it will lose is shape and sag making it useless.”
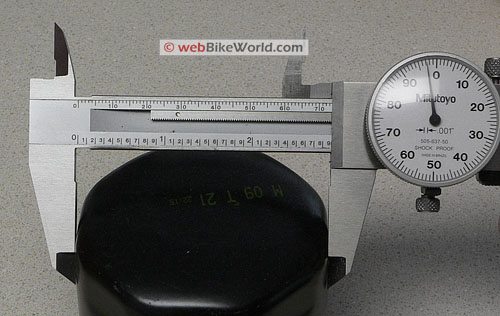
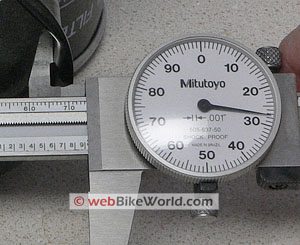
From “B.P.”: “Gentlemen, I think there is mistake in information about oil filter wrench as described in the article. The proper size of the “hex end cap tool” for filter removal is 76mm, not 74mm. This mistake has been repeated in the visitor comments; I have ordered referenced filter wrench from RepairManual.com and this is not the right one – it has 15 flats and is too small. I’ve checked with them that the proper size is 76mm (they are sending replacement). I also verified in the second source – ThumperTalk also lists 76mm as proper size for Ducati.”
Editor’s Note: I measured the oil filter and the wrench across the flats again and I come up with 74mm. Not sure if there are different sized filters, or….? Can anyone help clear this up?
Here is a photo of the measurement across the flats (8 flats, an octagon) of the Ducati branded oil filter. The Mitutuyo Vernier calipers show almost exactly 74 mm.
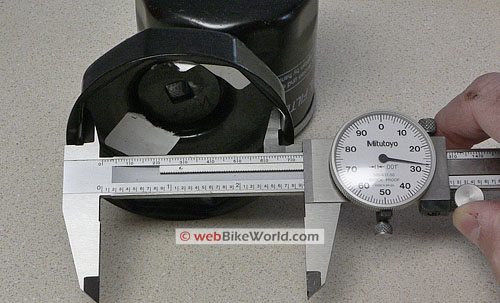
Here’s a photo showing the measurement of the inside of the oil filter wrench, it’s just about 74.5 mm across the flats, leaving some room for play for the cap wrench to fit over the oil filter. The top photo is a close-up, cropped from the bottom photo:
From Tom at Battley Cycles: “The 34A filter is the one specified by Ducati technically in their parts fiche for the GT1000. The 32A is put on at the factory OE. They also have a 32B. They are all the same as far as we can tell. They will ship us both 32B’s and 34A’s under the same part number. We have never seen reference to a 32A besides what the put on the bike from the factory. We can’t order one from the Ducati ARCO system. Sorry for the confusion. You can imagine how hard it is for the dealers to keep these things straight….”
From “I.B.”: “Hello Rick, Regarding your story on your oil change with your GT:
1. The plug denoted by the blue arrow (under the oil screen plug on the bottom of the engine) is a galley plug. Ducati makes a hole there when boring the oil uptake and uses a screw-type plug. ALL belt-drive Ducatis have a plug at this location. It does not need to be removed for oil changes. To my knowledge, the only time you’ll have it out is for assembly.
2. I have ALWAYS used a pair of Channel-Lock pliers to remove the oil filter. They are an indispensable home tool and are perfect for almost any size oil filter. That being said, I DESPISE single-use tools in my tool box. Channel Lock pliers are good for a number of things whereas an oil filter tool is not.
3. I use Perf-Form oil filters for my Ducatis. They are as better than the factory type. The factory filters are made by UFI Filters of Italy.
4. Ducati has a history of bikes which have funny-access issues. I have a Ducati-engined Cagiva Elefant 650 which requires removal of the right-side frame member to get to the oil screen.
5. PLEASE stress the importance of a deep socket for removing the screen. A normal-depth socket will hit the oil temp sensor head and break it. It is called a “thermistor” and it is part # 552.1.045.2a (ask me how I know!). Previous models used the same size plug head, but did not need a deep socket.
Also, the 600 mile check is not just an oil change. I don’t have a full list of all the checks they do, but a large part of it includes belt checks, bolt/nut torque checks, and exhaust tuning. I do all my own on my older bikes, but haven’t gotten around to getting the equipment for the newer EFI bike (I have an S2R as well as several other bikes, all Ducatis).”