GT1000 Fuel Tank Spreading Problem
We received a few emails recently from GT1000 owners who were asking if we knew anything about a problem with loose GT1000 fuel tanks.
Apparently, some owners have been experiencing a “spreading” problem.
The polycarbonate fuel tank material starts to spread or sag and the front fuel tank holders no longer do their job.
The fuel tank becomes loose in front, a potentially dangerous problem.
I hadn’t experienced this on my bike, until very recently, when I pulled the tank to install a relay wiring harness for an upcoming horn article Burn and I are working on.
Here’s a copy of an email that describes the problem, repeated from the GT1000 Blog entry that was sent by webBikeWorld visitor J.D., :
“I don’t know if you’re hip to this, but the SportClassic polycarbonate fuel tanks, especially the GT1000 tanks, have been prone to “spreading” and hence not connecting with their front mounting pegs.The result is that the front mounts for the tank don’t work and the front of the tank is loose. This puts undue stress on the single bolt that holds the back of the tank. This is a warranty fix. Ducati knows about it and is replacing a lot of tanks, mine included.
Check your tank. If you can grasp it at the lower front and pull it out of the “pegs”, then you should get a replacement tank. I asked my service guy if the new tanks were any better and he said that they would probably warp in the same way since they are made by the same manufacturer and of the same material.
So…? Pro Italia said that they were going to make longer “pegs” or whatever one calls them so that the tanks would be more secure to the frame as a fix. But, right now, I’m getting a new tank at Ducati’s expense.”
It’s hard to believe that something as simple as a fuel tank attachment would or could be a problem, but there you have it. I discovered it once I loosened the single bolt at the back of the tank (see this article on removing the GT1000 fuel tank), and realized that the entire tank could be lifted straight up and off the bike with nothing to catch it.
This isn’t how it’s supposed to work; there are two U-shaped brackets that are (fortunately) bolted on either side of the bike, attached to the top frame tube. Two matching rubber bumpers underneath the fuel tank are supposed to slip into these U-shaped brackets and hold the tank in front.
The system worked when I first got the bike, but apparently, the spreading problem is real — the fuel tank has spread out at the bottom, possibly due either to insufficient internal support or — I hope not — fuel softening the polycarbonate?
In any case, there’s an easy fix. Whether or not this is a permanent fix is yet to be determined. If the fuel tank doesn’t deflate any farther, I’ll be OK. I’m going to check with the dealer on this, although at least one webBikeWorld reader told us that the dealer he talked to would replace his tank, but he would expect the same problem to happen again, as the replacement tanks are made from the same material by the same supplier.
Disclaimer
We don’t usually post disclaimers because we assume webBikeWorlders are the most intelligent, knowledgeable and safest motorcycle owners and riders on the planet. True, right??
But note that messing with the fuel tank is a serious and potentially dangerous project. All of the fuel should be safely drained from the tank prior to starting this project. The battery should be disconnected — although on the GT1000, the fuel tank has to be lifted first to get to the battery.
This job should be done outdoors, away from the garage or house. Also, I don’t know if this “solution” is recommended, or if it’s dangerous, or will cause other problems. I’m only reporting what Burn and I did and it seems to work so far — I don’t know if it will work for you or if it will permanently solve the problem.
A Potential Fix
It’s simple: Add a few 6 mm washers under the U-shaped bracket that holds the rubber bumpers. I went down to the hardware store and got some M6x25 SHCS (socket head cap screws) and some 6 mm washers. I had to experiment to see how many washers it would take; I started with 2, which helped but the tank was still slightly loose, so I went to 3 on each side and the tank is now tight as a drum.
In fact, I had to give it some muscle to get the rubber bumpers to push up into the brackets. As long as the tank doesn’t spread any farther, I’m all set.
By the way — I first tried using a pair of Channelock pliers to spread the U-shaped brackets out, but that actually made the problem worse, because when they’re spread out on the bottom, they push in at the top, and there’s nothing left to prevent the rubber bumper from slipping right out the top.
Here it is in photos; again, read my article on removing the GT1000 fuel tank first:
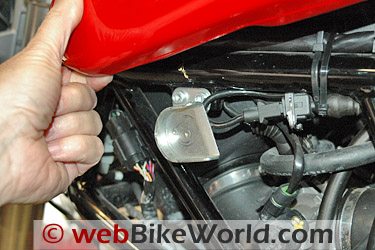
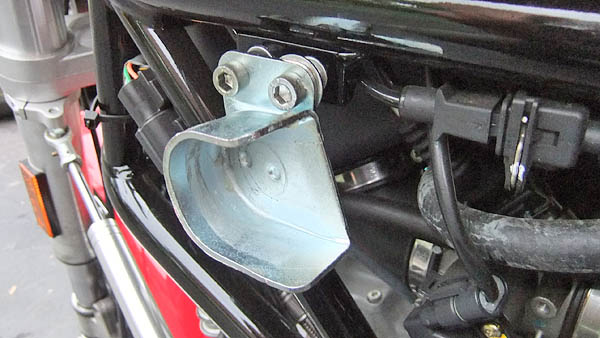
 In the photo above, the fuel tank bolt in the rear has been removed and the fuel tank is lifted. The bracket in the center of the photo is the culprit. After the fuel tank spreads, the lips of this bracket are too short to hold the rubber bumper that can’t be seen up underneath the fuel tank. Remove the two 5 mm SHCS and remove the bracket. The nuts that hold the screws are permanently attached to a bracket welded to the frame tube, so all you have to do is back out the screws.
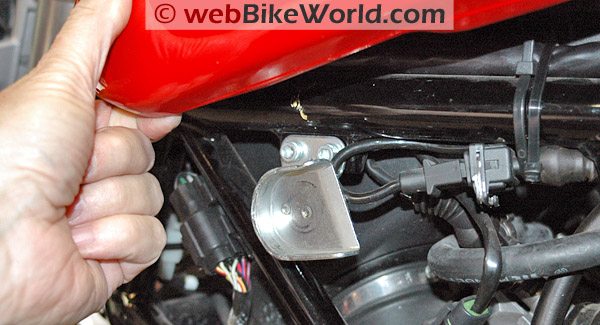
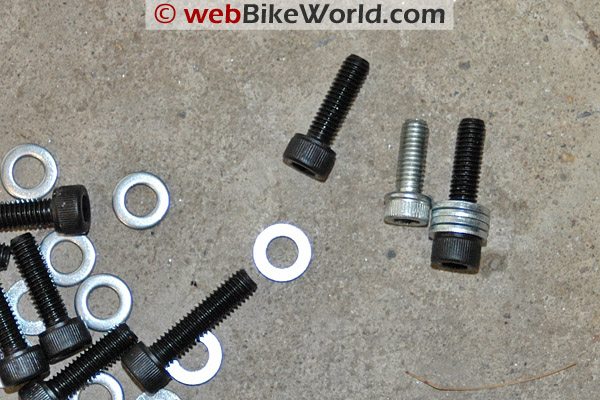 In this photo, the stock silver-colored 6 mm SHCS is in the center of the three. The 25 mm long SHCS is at the right with 4 washers. Note that the length of thread after the 6 mm flat washers have been placed on the screw is about the same as the amount of thread length of the stock silver screw.
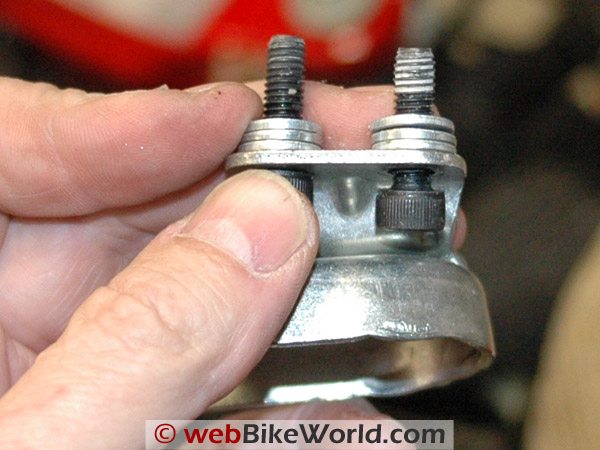 Here’s a close-up of the U-shaped bracket with the new M6x25 SHCS and the three 6 mm washers. Remember that the washers have to go on the side shown so that the bracket will stand out from the frame by that amount, in effect making the U-shaped bracket wider.
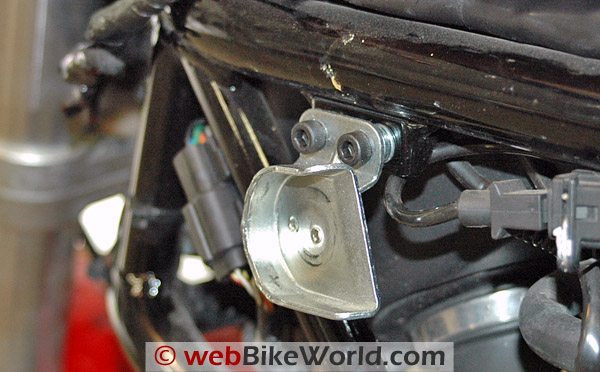 Here’s the finished product. The U-shaped bracket is installed with the 3 washers. Note that the bracket is now standing out from the frame by the width of the washers. You may want to use some blue Loctite on the threads to make sure the screws stay put. Be careful when re-installing the fuel tank. Put your hands underneath and feel to make sure the rubber bumpers under the tank are sliding correctly into the U-shaped brackets on either side. Note that you may need more or less washers, but I wouldn’t go more than 4 wide. Please send comments or any tips you might have on this project to the email address below.
Date Published: July 31, 2008.
UPDATE: December 1, 2009
I checked the fuel tank on both the GT1000 and the Multistrada 620 yesterday and both are still tight. So the fuel tank on my GT1000 has not spread any further than originally described in my “fix” above.
However, owners are still reporting problems with several Ducati models. I’m not sure what can be done, but my suggestions are:
- Report the problem to your country’s automotive or motorcycle consumer safety organization. In the U.S.A., that is the National Highway Traffic Safety Administration (NHTSA) Office of Defects Investigation. Vehicle problems can be reported here.
- Contact your dealer and demand a replacement. If enough dealers hound Ducati for replacement tanks, that will get someone’s attention.
- Send an email or registered letter to the Ducati distributor in your country.
More information on this in the comments section below.
Update: May 19, 2011
From wBW visitor “J.E.”: “Here are some pics of the new mounts available from Ducati. FBF did the install. The bike has 3,400 miles at this time. With the new mounts, there is no movement up, down or side-to-side. We’ll see how long this lasts.
The service manager at Fast by Ferraci said that the parts are released on case-by-case basis through contact with their dealer representative and Ducati North America. So as far as part numbers, I don’t have them, because a repair invoice wasn’t generated for the repair.”
 New fuel tank mounting bracket from Ducati.
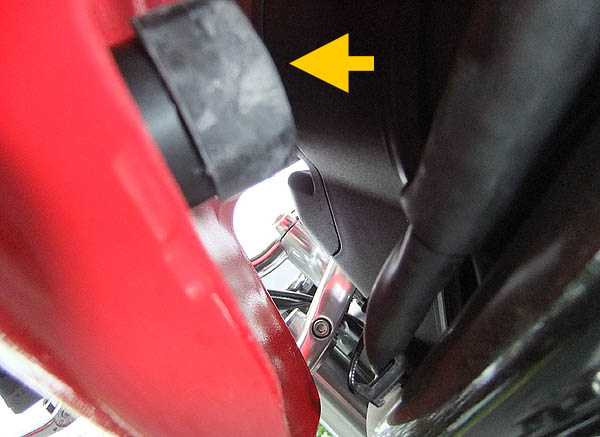 New mounting rubber for the GT1000 fuel tank.
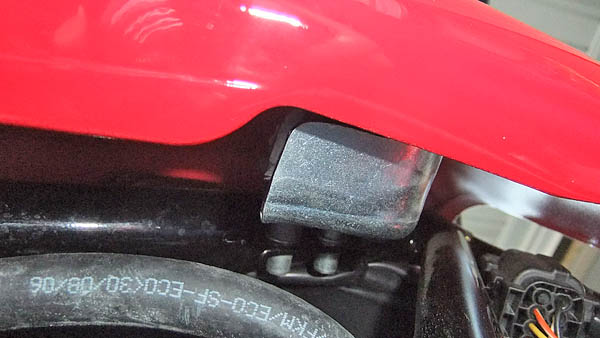 New fuel tank mounting bracket from Ducati, side view..
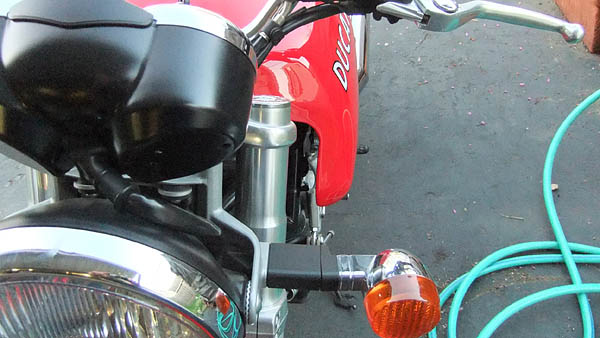 GT1000 front view with new fuel tank mount.
 Owner Comments and Feedback
See details on submitting comments.
From “R.A.” (April 2013): “CA Cycleworks is taking orders for replacement Multistrada tanks ($600 delivered in the US, more in Canada and overseas). This is to address the problem of tank expansion caused by putting ethanol in gasoline.
The tanks will come in red, black, and white; and they are made of a material that won’t be affected by ethanol. This should solve the tank expansion problem once and for all!”
[Editor’s Note: At this point, this is a “crowdfunding” project; it’s not really taking orders, they don’t have a product to sell. This is a search for investors so they can develop and manufacture the tanks, using the “Invested In” crowdfunding website. To be honest, I’m not a big fan of these arrangements, there seems to be little security for the “investor”.]But R.A. responded:
“You get all of your money back if the tanks aren’t produced. Also, CA Cycleworks has made replacement tanks for the Hyperstrada, so they already have a track record.
You can follow the development of this project on the Multistrada.net website. The other thing is that if you don’t “get in” on the initial run of tanks, I think they will be a couple of hundred dollars more expensive. You might contact Chris (Kelly) at CA Cycleworks about their replacement tank projects. I’d bet he’d be happy to share the relevant info, especially if it meant more publicity for their replacement tanks. I think your readers would be interested, too.”
From “I.B.” (January 2012): “I wrote to you previously about this issue. A lawsuit was filed over the tank deformation problem. A settlement was reached and has been finalized (last week). You can read the results for yourself (in this .pdf file).
A lot of people are very unhappy about it. Ducati basically is extending the warranty another 18 months and will only be replacing tanks if there is a cosmetic issue. If the tank is expanding with no cosmetic issue, they will offer to modify the tank mounts, or change the fork locks to accommodate the deformation. They have refused to consider the coating as a viable solution (epoxy tank coatings have been used for almost 3 years now to address the problem).”
Editor’s Note: I sold my GT1000 a couple of years ago. I have not experienced any problems with the fuel tank on my Multistrada 620.
From “DC” (August 2011): “I just picked up my 2007 GT 1000 from Metuchen Ducati in New Jersey. They installed the new brackets for my loose tank issues. This tank was replaced in February and came loose gradually over the summer. The new brackets have it tighter then it ever was and perfectly centered. I hope this works, getting stressed over it!”
From “B.W.” (August 2011): “I recently came across your article. I own a 2007 GT1000 and I am on my 4th fuel tank. All my tanks have spread and then have been replaced under the emissions warranty by Ducati for free. I don’t think shimming the brackets is a safe fix. If the plastic is deforming, this seems to be a dangerous situation to me and cosmetically, the fatter tank does not look as it was intended. My current tank seems to be holding up well.”
From “G.M.” (8/10): “I just wanted to add a few suggestions regarding the shimming process. It’s a really simple one person job if you stuff a small towel or something similar beneath the front of the tank and over the ignition to keep the tank in place with sufficient clearance to easily get at the brackets and do the job with both hands free.
Another tip – and I hope I’ll be forgiven if this one’s obvious – do the job with as little gas in the tank as possible so you wont have to muscle around so much weight. Since these tanks are plastic and seem vulnerable to a little “natural” expansion when they’re full and warm, it’s probably best to shim them snugly when their cool and close to empty and at their snuggest so that you leave them a little breathing room.
P.S. – Love the blog, and have found a lot of useful info there. I always recommend it to new GT owners I see on my Sport Classics forum.”
From “I.B.” (12/09): “I want to inform you and ask you to do a story about a huge problem that is affecting Ducati owners currently. All bikes with plastic tanks, which began in 2005 with the Monster S2R, including Sport Classics and Multistradas, have begun to experience problems with the gas tanks swelling.
This happened previously to the Sport Classic models and Ducati quickly replaced the tanks, however, stories have begun to surface about tanks being replaced a SECOND time — Ducati used the same formulation tank to replace the originals.
Now, the same problem is affecting Monster and Multistrada owners. Some have had 2 tank replacements. I am most familiar with the Monster owners because I participate on the Ducati Monster Forum and keep up with it.
So far, Ducati has said nothing about it. They are replacing tanks as a “good will” policy, but there is a growing fear that the replacement tanks will do the same thing.
My personal hypothesis is that the tanks are absorbing ethanol and expanding. This is not unusual and exactly the problem with early model gasoline engines whose seals are not impervious to alcohol. There is currently no ethanol in gasoline in Europe and from my examination of the parts catalogue for the European models, they are using the exact same part number for the gas tanks for USA models. I feel they must have tested the tanks with EU gasoline. Bring those tanks to the US market where most of us have ethanol (E10) gas, and boom!
I’ve been getting everyone to file NHTSA reports for their tanks, but I am afraid this is going to end up in litigation.
Ducati needs to make this right but they are not making it clear what the problem is due to and how they are preventing it from happening again. I got my tank replaced, the difference was phenomenal. My old tank had grown a full 4 inches in circumference at the center.
Photos (Hosted on Photobucket. Photos will open in new window):
-
Latch will not close at all. The latch should be approximately 10-15mm from the keyswitch when closed. Photo 1 | Photo 2
-
These are the rubber U bumpers. They are supposed to sit directly on the frame. Photo 1 | Photo 2
- Full view — doesn’t look like any problem at all from a distance: Photo 1
From “J” (5/09): “Hi. First let me say how much I enjoy your site. Great info about upgrades and recalls. I do, however, notice a lot of entries about problems with the GT’s gearing, master cylinder, tank expansion, etc.
I have a 2007 GT1000 with 10,000 miles on it. It’s a daily rider to and from work as well as weekend excursions with my wife on her monster. I purchased it and before it even came home with me it had the Termi, ECU upgrade with.
Now I know nobody wants to hear this, but I have never experienced a single problem with this bike! The gearing is perfect, no tank expansion, nothing. Just had to drop a note and let everyone know that this is a great bike. Treat it well and it will return the favor. Good Luck.
P.S. My new sport rear hugger from Geoff (review) is awesome! Thanks for the info and connection!”