


See Below: Unique new Comagination dual headlight modulator includes a solid-state relay!
Give me some metal and a few tools and I’ll build anything. But when it comes to electricity, I’m dumbstruck.
I’m not sure why actually, although I stuck my finger into way too many outlets as a toddler, so perhaps it’s a Pavlovian reaction to all things electric.
I wanted to install a headlight modulator in our latest test mule, our ’98 Triumph Tiger, but the Tiger’s twin headlights (which are both on when the bike is running) caused me some concern. I had visions of having to rip apart the entire wiring harness, sparks flying, trying to get both headlights synchronized with a pair of modulators.
We’ve installed several modulators over the years (see the wBW article on the U.S. Federal regulations allowing headlight modulators on motorcycles and the Canadian regulations covering the same), and the combination of a headlight modulator, a brake light flasher and extra LED brake lights is a standard safety package installed on all webBikeWorld machines.
By the way, there is still some misinformation around the Internet regarding headlight modulators. You’ve probably read a thread in a motorcycle discussion group where the author will state that modulators are not good, they’re illegal, they “blink on and off” and send the wrong message to oncoming drivers, etc. It’s usually immediately apparent that they were written by someone who has never seen a modulator in use.
Although there are no studies that we are aware of that prove the effectiveness of modulators for motorcycle visibility, both the U.S. and Canadian governments have approved them for use in all 50 states and all Canadian provinces. Motorcycle headlight modulators do not “blink the lights on and off”. We took a short (10 second or so) Quicktime video clip of the Comagination modulator in action on the Triumph Tiger to give you an idea of what a motorcycle headlight modulator looks like in use. Note that Quicktime is available as a free download on the Apple website.
Comagination Headlight Modulators
Our experience with the Comagination Visipath single bulb headlight modulator has been very positive (see thewBW review and installation article), so I visited their website to see if they had any tips on installing a headlight modulator on a twin headlight motorcycle like the Tiger.
That’s where I found Comagination’s dual headlight modulator, available with or without a built-in solid-state relay. The 1995 and later Tigers already have headlight relays installed at the factory, according to my Triumph wiring diagram, but we tried both Comagination modulator kits for evaluation purposes.
The modulator with solid-state relay kit is a new and unique device; Comagination says that it’s the first application of its kind. A solid-state relay has several benefits, including low cost, small size, fast switching and no moving parts. The modulator with solid-state relay (Model AIODR20H4) has a list price of $109.90 (plus S&H), is rated to work with bulbs up to 115 Watts and can be used to modulate either the high beam or low beam.
The non-relay version of the Comagination headlight modulator (Model D115H4) has a list price of $79.95 (plus S&H) and is rated to work with bulbs up to 115 Watts. 115 Watts is probably way more than any motorcycle headlight reflector or housing can handle without melting, but it’s nice to know that it has this capability.
Installation
Installation of the dual headlight version couldn’t be easier. Both kits come with a one-page instruction sheet, and the folks at Comagination are available for help if needed. The steps are identical to the single headlight version installation, except there are two pairs of connectors, one for each headlight.
The back of an H4 headlight bulb has three prongs attached, which are used to power the bulb (low, high and ground). Unplug the female connector from the back of the bulb and plug in one of the modulator’s female three-pronged connectors in its place.
At the opposite end of the wires that lead from the female bulb connector is a male connector that plugs into the bike’s electrical system.
Unplug the male three-pronged connector and plug in the matching connector from the modulator and you’re just about done.
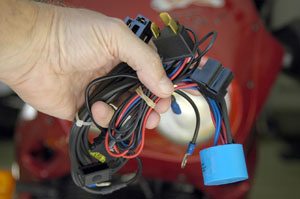
The male/female connectors on the Comagination kit are paired (Photo 1); the modulator (blue cylinder, Photo 2) is located in the middle of the two pairs of connectors.
I’ll just about guarantee that it will take longer to access the back of your bike’s headlight than it will to connect the modulator kit. The Tiger’s headlight bulbs are easily accessible by simply reaching up behind the fairing, and installing the connectors took only a couple of minutes.
The only thing left to do is to find a location for the modulator’s light sensor. U.S. and Canadian laws regulating motorcycle headlight modulators require that the modulation ceases below certain light levels.
So every modulator kit comes with an “electric eye”, that is, a tiny sensor that senses the amount of background light and stops the modulator when required.
The sensor must be located upright and in a location where it won’t be affected by shadows from a fairing or other accessory. The thin wire from the sensor is fed back through the headlight or fairing and the sensor can be located in a convenient position.
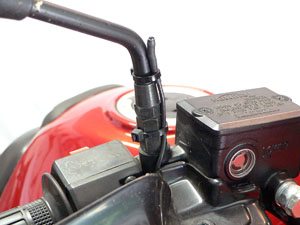
Since the Tiger has a small fairing and the headlights are not housed in headlight shells, it was very easy to run the wire out the back of the fairing. I located the sensor on the right hand rear view mirror (see Photo 3), and it works well.
High or Low Beam Modulation?
Comagination recommends modulating the headlight’s high beam, and their modulators are set to do so at the factory.
We’ve used motorcycle headlight modulators for many years, and our feeling is that high beams distract other drivers to a point of annoyance, and the high beam can also interfere with an oncoming driver’s ability to see the motorcycle’s directionals when flashing.
However, modulating the high beam can provide a greater area of visible modulated light, because of the wider projection of high beams. Also, the headlights can be switched to low beam to turn the modulator off.
It’s a matter of personal preference, but we prefer to modulate the low beam. One of the nice features of the Comagination modulators is that they can be converted from modulating the high beam to modulating the low beam by switching the wires. The process is described in the installation instructions, and it’s a simple matter of swapping the red and blue wires in both the male and female connectors on the modulator.
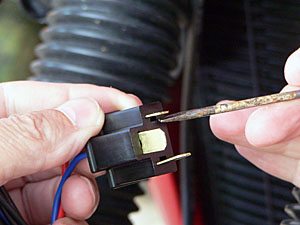
The wires are removed from the plugs by sliding a small screwdriver blade into the little rectangular hole next to the male or female connectors (Photo 4). It takes a bit of fiddling (the male connectors come apart much easier than the female connectors), but it’s relatively easy to do. We swapped our wires to modulate the low beam.
Follow the instructions, although note that although Comagination provides the information on how to modulate the low beam, they say “We only recommend and support high beam modulation.” I’m not sure what it means to “support high beam modulation”, but there you have it.
We also recommend using some electrical tape to hold the connectors together and using the supplied cable ties to make sure the modulator’s wiring harness is secured to the bike. When mounting the sensor on the handlebars, like it is on our Tiger, make sure there’s enough play for the handlebars to turn back and forth without binding.
Unique New Type of Headlight Modulator With Solid-State Relay
The Comagination modulator is also available with a unique solid-state relay (Model AIODR20H4). Comagination says that this is the “world’s first” modulator using this technology, and webBikeWorld is honored to have been offered the first opportunity to try this device.The relay must be very small, because there’s no difference in size between the blue cylinder that holds the electronics in the standard modulator and the relay version.
A Note About Relays
Relays are powered switching devices that are sometimes used on motorcycles to switch accessories that are under heavy electrical loads at startup, such as the headlights or horn(s).
Motorcyclists may find that adding a headlight relay and a wiring harness which brings power directly from the battery to the headlights will increase the brightness of the bulb, because wiring harness losses are eliminated.
We have noticed a difference in brightness after installing a headlight relay to a late-model motorcycle that had a very narrow gauge wire powering the headlights. The robust wiring of the relay’s harness helped bring full power to the headlights, lending them a greater apparent brightness. We’re not sure if it was the result of the wiring, the relay or both, but it worked.
Another benefit of adding a relay to the headlights is that the motorcycle’s switchgear may last longer. Using a relay eliminates the heavy electrical load that runs through the handlebar switchgear, which can cause arcing and heating degradation of the switch component.
Adding a headlight relay, especially for a motorcycle with dual headlights, can be much more complicated than adding a simple modulator. Also, relays are relatively large, and finding a secure location to mount one or two adds to the difficulties. And most relays used in motorcycles are electro-mechanical devices with internal moving parts, subject to breakage.
Comagination Headlight Modulator With Solid-State Relay
Comagination has developed a unique and interesting “breakthrough” design by adding what they say is the world’s first solid-state relay to their headlight modulator. The relay modulator kit (Photo 5) is similar in appearance and construction to the standard dual headlight unit described above (Photo 1), with a few minor exceptions.
Both female headlight bulb connectors are replaced with this modulator’s connectors, just like the standard (non relay) modulator described above. However, only one male headlight plug is used to connect to one of the headlight power supply connectors. The motorcycle’s second connector is not used, and must be disconnected from the second headlight and secured with electrical tape.
The single connection will power the relay, which will then signal the relay to turn on the headlight high or low beams, while the modulator will modulate the headlights (or headlight in the single headlight version). The other major difference is that the modulator with relay kit includes a separate wiring harness for accessing electric power directly from the motorcycle’s battery.
It’s important to follow the instructions provided with the unit, but in general, the wiring harness plugs in to a male and female connector that extend from the relay (blue cylinder) and the other end of the harness is routed through the bike and back to the battery, where it is connected to the positive and negative terminals. Several cable ties are provided to secure the harness. A 20-Amp plug-in fuse and fuse holder is also provided.
The modulator with relay kit is only slightly more difficult to install than the non-relay kit; there’s less work up front near the headlights, and slightly more work in routing the extra harness back to the bike’s battery. But everything is well marked and the connectors are high quality, so it’s not really very hard to install. Much easier, in our opinion, than installing a separate headlight relay harness.
Also, the modulator kit with relay can also be switched from high to low beam modulation by swapping the blue and red wires using the same technique described above.
Conclusion
The Comagination headlight modulator with relay is a unique “breakthrough” product, and it eliminates the complications with installing a separate headlight relay switching system. Its solid-state relay lowers the cost and effort of adding a headlight modulator and relay because the two products are combined into a single unit. The modulator is very small; it’s smaller than other modulators, and much smaller than a separate modulator and relay system. The solid-state construction also means faster switching speeds and no mechanical relays to fail.
Both versions of Comagination dual headlight modulator kits are very easy to install and have no moving parts. The modulators are claimed to be the “world’s smallest”, and most motorcycle headlight shells should have enough room to install the unit. Note that although we installed the dual headlight kit, a single headlight modulator and modulator with relay is also available.
Motorcyclists with limited mechanical or electrical skills should have no problem installing these products, and we were pleased to find that it’s just as easy to install the dual headlight modulator as the single headlight version.
We’ve been very satisfied with Comagination’s products and have no problems to report. Our Comagination single headlight modulator has been in use on two different motorcycles for about 3 years with no problems. The prices are reasonable and the products work as advertised.
Note: For informational use only. All material and photographs are Copyright © webWorld International, LLC – 2000-2011. All rights reserved. See the webBikeWorld® Site Info page. NOTE: Product specifications, features and details may change or differ from our descriptions. Always check before purchasing. Read the Terms and Conditions!
| Product Review: Comagination Dual Headlight Modulator | |
| Available From: Comagination Made in: U.S.A. |
Suggested Retail Price: $79.95 (H4, dual headlight standard); $109.90 (H4, dual headlight with solid-state relay) |
| More: Comagination Visipath single headlight modulator revew | |