The Actron brake bleeder is the best way to bleed motorcycle brakes that we have found so far.
It’s a bit tricky to use, but once you figure out how to get the hose to fit the bleed nipple, it works well.
Motorcycle Brake Bleed Redux
It’s been some time since we first wrote about motorcycle brake bleeding.
Our original article (below) describing the use of an Actron brake bleeder (below) is still valid, but that article was posted on webBikeWorld way background 2002.
In 2009, I noticed the brake fluid on our 2006 Ducati GT1000 was starting to look pretty swampy (see photos below).
So I figured that as long as I was going to flush and refill the brake and clutch fluid on the Ducati, I may as well update this article to see if we’ve learned anything new in the interim.
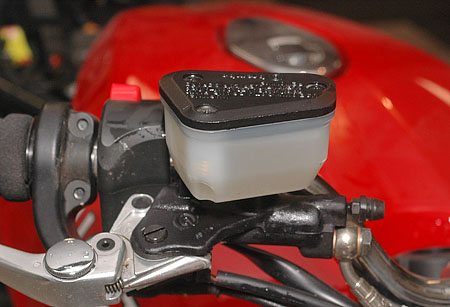
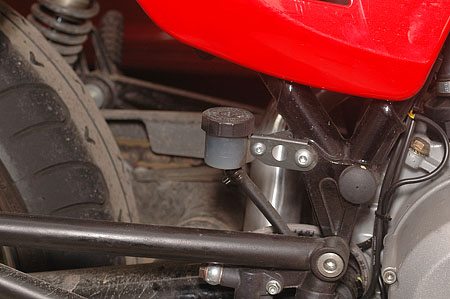
The Ducati was only about 6 months old, but I noticed recently that the tiny rear brake fluid reservoir looked very dark, a sure sign of brake fluid that’s overdue for replacement.
I opened the cap and sure enough, the brake fluid was way overdue for a flush and fill.
I’m not sure why the fluid got so dirty so quickly.
Most of the time, I chalk it up to moisture in the air that quickly affects the very hygroscopic (easily absorbs moisture) DOT 4 brake fluid. I flush and refill the brake fluid in my cars about once per year and the same goes for the motorcycles.
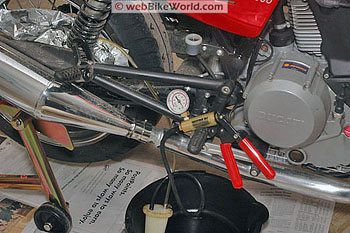
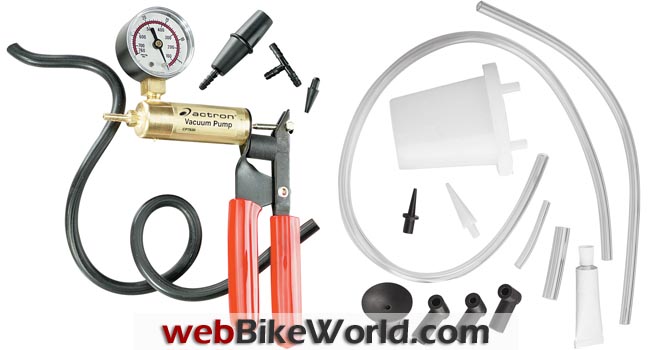
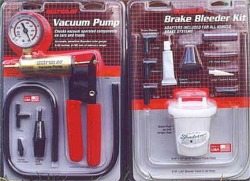
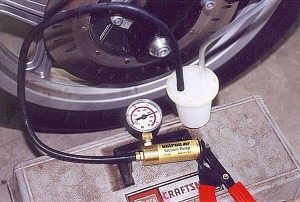
(L) Actron CP7830 Vacuum Pump and CP7840 Brake Bleed Kit (R).Flushing and Bleeding Motorcycle Brakes and Clutch
For some reason, brake fluid flushing is not addressed in any automobile owner’s manual I’ve ever seen, but it’s just as important for four wheels as it is for two.
I learned the hard way, when a master cylinder became completely corroded due to the water that was in the dirty fluid.
Believe me, replacing a master cylinder or disk brake caliper is way, way more expensive and time consuming than simply flushing the brake fluid once a year.
And besides, it’s always nice to know that you have fresh fluid in the lines when you squeeze the brakes…
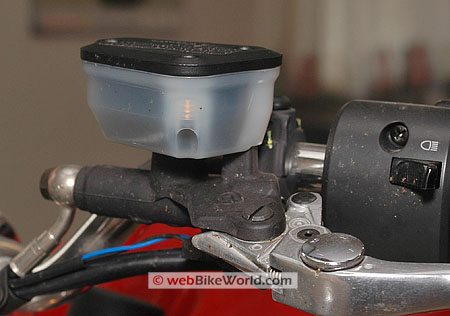
The front reservoir wasn’t as dark, but it was starting to turn yellow, which is the first sign of contamination.
Brake fluid is perfectly clear and should look that way in the reservoir, so take a look at yours and see if it’s time for a flush.
The Ducati GT1000 also has a hydraulic clutch, which also uses DOT 4 brake fluid.
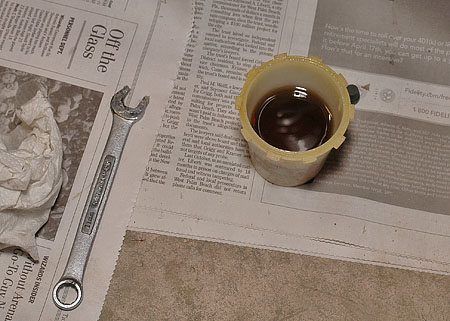
It was dark also; not quite as dark as the rear brake reservoir, but definitely in need of a flush. So this was going to be a trifecta of motorcycle brake bleeding!
The procedure is pretty simple actually and it’s described in our original brake bleeding article below. We’ve been using the Actron brake bleeder successfully for many years; in fact, I’m starting to wear it out and it’s time for a new kit.
Actron CP7830 Hand Vacuum Pump
The Actron Vacuum Pump Brake Bleed Kit (their part number 7835) is still the way to go.
The entire kit, including both the pump and the accessory parts, is now available through this webBikeWorld Amazon.com affiliate link with a current list price of $49.99 and free shipping!
The kit consists of the individually available Actron Hand Vacuum Pump (their part number CP7830) and the CP7840 Brake Bleed Kit.
The bleed kit consists of a collection container that can be vacuum sealed and the hoses.
Believe it or not, back when we first published the article below, Actron had very little information about the product on their website.
By the way, an enterprising tinkerer could make a collection container, and I’ve thought about trying this because the Actron container is really too small and too light weight to be positioned correctly when bleeding the brakes.
I wish they had the option of a larger container that held about twice the volume of the container provided with the kit.
Front brake fluid reservoir before flush and refill. The brake fluid should be clear, not yellow! Here’s the front brake fluid reservoir after it’s been flushed and refilled. This is the rear brake fluid reservoir before the flush and refill. And this is how the brake fluid should appear in the rear brake fluid reservoir. Yuck! This is the brake fluid that was drained from the rear brake reservoir! Clutch fluid reservoir prior to the flush and refill. The fluid should be clear. The clutch fluid should look like this!Example: Ducati Brake Bleeding
Bleeding the Ducati brakes was no different than bleeding the brakes on any of the bikes that have been through the webBikeWorld garage.
That includes bikes such as the old BMW R65, the BMW R100RS, the BMW K75, Burn’s Suzuki Bandit or TL1000S, Triumph Thunderbird Sport, Triumph Tiger or any other motorcycle I’ve worked on since the original article was published.
They’re all basically the same when it comes to brake bleeding.
I did notice that the clear hose that I have been using to place over the brake bleed nipple needed to be trimmed each time I used it. I think the hose is getting old and hard and it needs replacement.
This was exacerbated by the bleed nipples on the Ducati, which seemed to be very sensitive to the exact alignment of the hose on the nipple.
It was difficult to start the bleed without bubbles seeping in at the junction where the hose met the nipple.
I used lots of petroleum jelly to seal the area and had to hold the hose as perfectly straight on the nipple as possible and eventually it all worked out fine. Again, this is described in the procedure below.
The entire process — bleeding the rear brake, front brake and hydraulic clutch, took less than one hour.
I did have a helper to pour in the fresh brake fluid as I was concentrating on working the Actron pump, but I’ve done it myself many times.
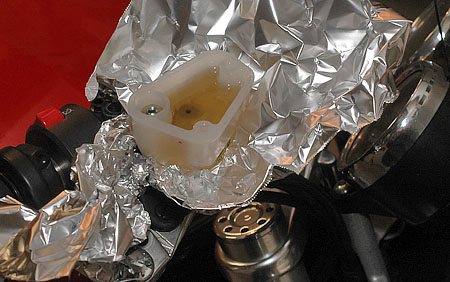
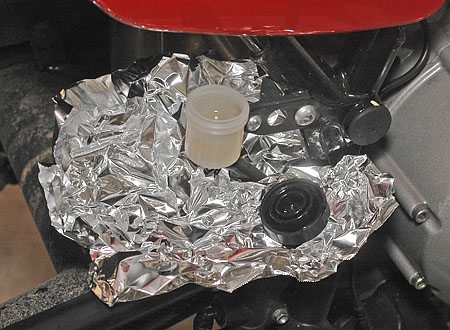
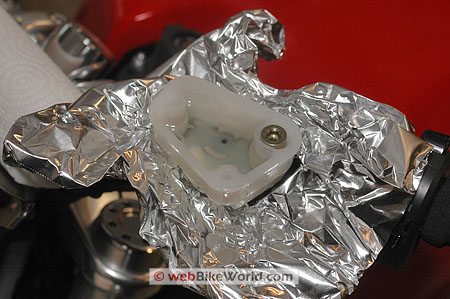
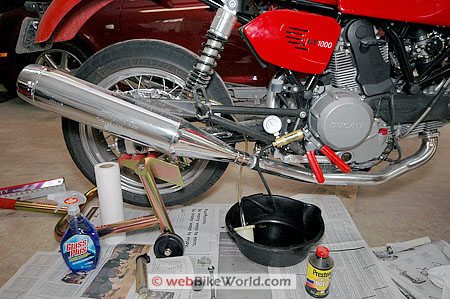
The next photo illustrates all of the tools that are necessary. In addition to the Actron kit, I usually keep a roll of cheap aluminum foil in the garage.
The foil is used to cover the metal under the brake bleed nipple and the brake fluid reservoir to prevent any drips on the bike.
Brake fluid is supposed to be super-corrosive, but I’ve never had a problem with it, simply wipe it off and keep a spray bottle of Glass Plus handy to clean off the fluid if it drips.
I have never damaged any paint, even after the brake fluid has dripped on various surfaces of the bike for some time (even overnight) before I cleaned it.
I’m not saying that it won’t happen, I just think it isn’t as bad as some people will have you believe and you shouldn’t let this stop you from flushing and refilling your own brakes.
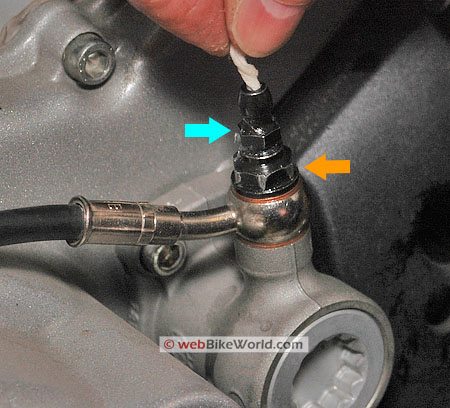
By the way, when bleeding the clutch, I made a mistake.
Note the photo above; you can see that the nut that holds on the banjo fitting (orange arrow) is starting to get rounded at the corners.
When the rubber nipple cover was attached, I didn’t see the top (blue arrow) correct bleed nipple nut.
I started to loosen the banjo nut and it was very tight and it started to strip. I then realized that the correct nut was hidden by the cover.
The only other tip I can add is illustrated in the photo above. After the lines are bled, roll up a small piece of paper towel and stick it in the nipple after the nipple has been tightened.
This will soak up most of the small amount of remaining fluid in the nipple. Good luck and ride safe! (April 2007
The Original Actron Brake Bleeder Review
Background
Let’s face it – motorcycle maintenance and repair tasks like bleeding the brakes or the hydraulic clutch on your motorcycle can be a pain.
But it is a very necessary maintenance task to perform — and it should be done at least once a year.
Brake fluid is hygroscopic (readily taking up and retaining moisture); it attracts water.
This water is in the form of moisture in the air.
Moisture in your braking system is very dangerous, as water boils faster than brake fluid and can lead to serious problems with the braking performance of your bike.
It can also corrode parts of your brake system, including fittings, pistons and the master cylinder.
Believe me, I can tell you from experience!
I purchased a 1994 BMW K75 in the winter of 1999. It had only 4,200 miles on it and was a real beauty.
But the original owner never rode it much, and other than the initial 600 mile maintenance, no maintenance had been performed on the bike.
The brake fluid looked very nasty and brown, so I decided to flush and refill the system.
It took about 2 bottles of brake fluid to clear out the system, and then the master cylinder started to leak. I guess the old fluid was so thick, it helped seal the gaskets!
I took it apart and found all sorts of corrosion in the bore of the master cylinder, so I had to replace it to the tune of about $175.00.
It took about another 2 bottles of brake fluid to flush the system over the next couple of months to get the fluid looking clear and the system working up to par.
Since then, I’ve gotten into the habit of flushing the brake system, front and rear, twice a year.
Once in the fall and once in the spring. I don’t put my bikes to bed in the winter; we’re fortunate to have occasional days with nice weather where I live, so I try to ride as frequently as I can in the winter.
But there can be two or three weeks between rides, and that’s when the moisture and corrosion can build up on a bike.
I never could get the hang of bleeding brakes by hand.
Fill the jar with brake fluid, then while holding the jar reach up and squeeze the brake lever (which happens to be on the opposite side of the front brake bleeding screw on my K75).
Then somehow shut the brake bleed fitting before releasing the brake lever, right?
Or something like that….
Somehow, I just can’t see the point of the “speed bleeder brake bleeding valves” sold under various names.
You have to put some type of goo on the threads of your bleed fittings, then you still have to use the old “squeeze-release” method. It just seems to make more sense to me to use a vacuum pump for this job.
There had to be a better way.
I read about the “Mity Vac” brake bleeding tool. But a friend of mine gave me some good advice about spending the extra few bucks and buying a “professional” system — the Actron pump and brake bleeding kit.
The kit only costs about $65.00 on the Actron site or you can buy an identical kit but without the fancy carrying case shown on their website for about $45 at Sears, Pep Boys or other auto parts stores.
It pays for itself in probably one use if you can do-it-yourself rather than bring it into the shop. Shops around here are getting in the neighborhood of $60 per hour, so I figured it would pay for itself with the first bleed.
The Actron unit is very well made — out of metal. But the best thing about it, I’ve found, is the vacuum pump gauge.
It lets you see exactly what’s happening as you perform the bleeding, and as long as the gauge shows that you’re holding some vacuum in the system, it means air isn’t entering in through the bleed fitting.
Using the Actron Vacuum Pump Kit
It’s very easy to use the Actron system and it makes bleeding brakes a simple job with “no muss or fuss” (See “More Tips” below).
I’m at a point where I can bleed both the front and rear brakes on my bikes in less than 30 minutes from setup to cleanup.
The way I figure it, the easier it is to do, the less likely you’ll be to ignore the maintenance!
The complete kit consists of the hand pump, two hoses and a container to hold the used brake fluid.
The container has a screw-on top which is airtight once sealed; the top has two nipples on it, one is for the hose that goes to the pump and the other is for the hose that goes to the bleed fitting.
Grease Your Threads!
There is also a tube of some type of grease you can use to put around the threads of the bleed fitting after you’ve loosened it.
But after I used up the little tube that’s supplied in the kit, I simply use either generic brand petroleum jelly or regular grease in its place.
Before you begin, make sure the master cylinder cover is loose, otherwise you won’t be able to overcome the vacuum created by trying to suck the fluid out of a sealed system.
First Remove Old Fluid
Use an old turkey baster to suck out most of the old brake fluid in the master cylinder, and you can use a clean paper towel to wipe out any sediment.
Then fill the reservoir up to the top with fresh fluid — always put the cap back on the brake fluid container as soon as you can.
I also set the top back on the master cylinder, just to make sure no dirt or dust find there way in there.
The Hot Tip
By the way, here’s a tip — I use a couple of pieces of aluminum foil and spread them around the master cylinder and over the gas tank and anywhere else the brake fluid might drip.
Brake fluid is supposed to be pretty corrosive stuff on paint jobs, so I always keep a spray bottle of non-ammonia window cleaner (e.g., “Glass Plus” non-ammonia brand) nearby and some paper towels to spray and clean up any brake fluid drips as quickly as possible.
I also spread some foil around the brake rotor and around the bleed fitting to prevent the fluid from landing on anything important — like my tire!
Preparing to Bleed
Screw the top on the Actron container, attach the black hose from the pump to the container, and the clear hose from the container to the bike’s bleed fitting.
The clear hose is so that you can see the fluid as it comes out and you can tell if there are bubbles in it.
You may find that the end of the clear hose will stretch a bit after 2-3 uses, so you may need to trim 10 mm or so off the end of the hose with a sharp razor knife.
This gives you another section of un-stretched hose end, which is harder to get over the bleed nipple, but helps to keep the seal airtight.
Pump the handle of the Actron pump a couple of times to make sure you can draw a vacuum, and let everything set for a few seconds to make sure the vacuum holds.
If the vacuum gauge starts to drop, you probably have some air leaking in, so you should check everything to make sure it’s sealed.
The instructions tell you to put some grease on the threads of the container to help prevent air leaks, but mine seems to work well without it, although I do put plenty of grease around the bleed nipple threads.
Slightly loosen the bleed fitting, and you should see the old fluid start to come out. I keep about 10 pounds of vacuum going (see the photo on the right), which means you’ll have to give a few pumps occasionally.
Again, make sure you put some grease around the threads of the fitting to prevent any air leakage.
I rest the container on top of an old plastic toolbox, which means this is basically a one-hand operation.
It’s important to keep an eye on the brake fluid level in the master cylinder.
If I’m alone, when the level gets low, I screw the bleed fitting back in and go around the bike and pour some fresh fluid in. If I can talk my wife into helping me, she keeps an eye on the fluid level and keeps it refreshed.
Also, check the old fluid level in the container that’s attached to the Actron pump — if it gets too full, it will get sucked up into the pump body itself.
Cleaning
Although one of the nice things about the Actron pump is that it’s all metal and can be taken apart for cleaning.
It’s a good practice to take the pump body apart and clean it with some water and dishwashing liquid after using it anyway, then dry it before you put it back together.
That’s really all there is to it — keep up the vacuum and you will see the old fluid pour into the container.
As long as you keep a vacuum, you know you’re sucking fluid down through the system. It takes a few times to get the hang of it; you’ll probably find that you only need to crack the bleed nipple very slightly to get a smooth, steady flow of fluid.
You can screw in the bleed fitting at any time and see if there’s a drop in pressure — there shouldn’t be, but if there is, it means that air is getting into the system somehow and you should check the hoses and the container seal to make sure they’re tight.
I usually put about 2/3 of a bottle of fresh brake fluid through the system and figure it’s flushed. I’ve really never had any problems with air leaking back into the system.
Using the Actron pump works great when the system does have air in it, like after you’ve changed the master cylinder or replaced the brake lines.
I’m not sure of the technical reasons, but it seems like when pulling the brake fluid down through the system is better than trying to push it through by hand.
The only way that might be better is the professional systems available at some motorcycle dealers that pressurize the system and automatically push the fluid through.
This type of system is sometimes used on motorcycles with ABS braking systems.
More Tips
You may find that at first you’ll get air bubbles into the bleed hose no matter what you do. It does take practice! It took me several times of bleeding before I could get the hang of it, but now it works great.
First thing I learned is not to use the black “L” shaped fitting that Actron supplies for the end of the clear hose. I was never able to get it to create a decent seal.
I then went to the local hardware store and bought some 5/16″ OD x 3/16″ ID clear tubing.
Cut the end off with a sharp razor knife so that it’s perpendicular to the hose. It’s very hard to get the end of the new hose on to the bleed nipple, but if you warm it up a bit with your breath, it will fit.
First thing before you open the bleed screw is to give it some vacuum and make sure nothing’s leaking. If it is, then you know the hose isn’t on their correctly, but with a tight fit, it should work ok.
I also got a very small screw-type hose clamp and clamped the other end of the hose to the little container they give you.
I had originally greased the threads on the container also, but later on found that it didn’t seem to matter.
Then make sure there’s a real good dab of grease all around the threads.
Open the bleed screw slightly; the trick is in learning how to just open the bleed screw enough to get a slow flow of fluid and not to open it too far.
I think at first I was trying to get the fluid out too fast, but it’s better to take your time and let it come out slowly.
Like everything in life, it does take some practice to bleed the brakes without air bubbles; the first couple of times I did it I had some problems.
Now I can almost always do it first time with no air bubbles at all on any bike I’ve tried. I will go back and add this to the article…..
NOTE: You can also build a “reverse” brake bleeding rig that works by pressurizing the brake fluid in the master cylinder and pushing it out the bleed nipples – use a Gunson EZE Bleed (review)from Auto Expert Products; they’re only about $30.00.
UK Brake Bleeding Kit: A similar kit is now available in the UK, called the Motrax Big Bleeder Kit.
| wBW Review: Actron Vacuum Pump Brake Bleeder | |
|---|---|
| Manufacturer: Actron | List Price (2016): $49.99. |
| Review Date: February 2009 and 2001 | Made In: U.S.A. |
Owner Comments and Feedback
See details on submitting comments.
From “R.M.” (4/09): “Great article about using the Actron Brake Bleeding kit to bleed motorcycle brakes. I just wanted to add some information that may help Canadian readers.
The Actron kit referred to in the article is available in Canada at all Princess Auto locations as their “Power Fist Brake Bleeder and Vacuum Pump”.
The Princess Auto part number reference is 8050832 and is priced at around $50 CDN.
I do not have any affiliation with Princess Auto or Actron.”
From “TD”: “Just finished mine. You do not need a vacuum pump. Just a small piece of tubing to fit over the bleed fitting.
Place the tube over the fitting and open a 1/2 turn. Remove the filler cap and let it gravity drain.
Clean out the reservoir with paper towels. Fill with fuid and let gravity drain.
You can go faster by actuating the the cylinder. Make sure to keep filling the reservoir to keep air out. As a final bleed, I did it just like a car.
Close the bleed, apply pressure to the actuator, open the bleed a 1/4 turn till the actuator depresses. Close the bleed, release the actuator. Repeat till your satisfied it’s bled hard actuator/no bubbles in tube).”
From “G.”: “Great article. A couple of other tips, etc:
– I bought the Actron and the first time I used it the clip linking the grip with the plunger exploded.
I didn’t have time to try and get a replacement part, so I bought the MitiVac “Silver Edition” (I think) bleeder at Sears.
It comes in a plastic case and has an all-metal body, unlike the cheaper plastic-bodied version. I t works fine.
– I too found the included collection jar to be too small, so I took a spaghetti sauce jar and drilled two holes in the lid for the bleed hoses. I ran in the tubing and sealed the holes with Goop.
I also used pliers to fashion and attach a hanger (made from a wire coat hanger)-this is great for keeping the jar upright and out of the way…
– To “reverse bleed” you can buy a large syringe (I bought one for two-strokes at the local motorcycle shop). Partially fill it with brake fluid, attach it with tubing to the bleed screw, open and depress GENTLY.
This will force most of the air up through the line and out at the master cylinder/reservoir. Be careful to use foil or rags around the reservoir as the bubbling air/fluid can splash out.
This step will save you a lot of time if you do it first, then bleed normally.
– If you can’t seem to get rid of the air, try depressing the brake lever slightly, crack the banjo bolt at the brake reservoir/master cylinder just enough so fluid begins leaking out, close the banjo and release the lever.
This can get rid of air lurking around the banjo.
– It may seem that no matter what you do, the lever stays spongy. Try this: With the reservoir lid off, depress the brake lever halfway and secure it with a Velcro tie, a zip tie, tape or whatever.
Leave it overnight. In the morning put the cap back on, take off the tie, put push the bike and pump the lever a couple of times…if you’re in luck it will firm up.”
Editor’s Note: Good tips, thanks! I almost always zip tie the brake lever squeezed tight overnight and forgot to mention that in the article.
From “M.J.F.”:” I am pleased you did a write-up on the bleeding/flushing of hydraulic system on a motorcycle. This is a small bit of maintenance that is far too often overlooked.
Your comment however on the use of Speed Bleeder/speed bleeder type nipple couldn’t be more wrong.
Once installed the system can be bled several times before the thread sealing compound has to be reapplied, about the time one should be doing a more thorough flush/rebuild anyway.
I had used vacuum system for several year before putting Speed Bleeders on my ST1100 (both brakes and clutch) and would not go back to vacuum.
As the name implies Speed Bleeders (or other same type alternatives) are very quick to use and really do prevent the re-admittance of any air into the system.
Excellent site, please do keep it up, I find it to be a valuable resource for reviews and how-to information.”