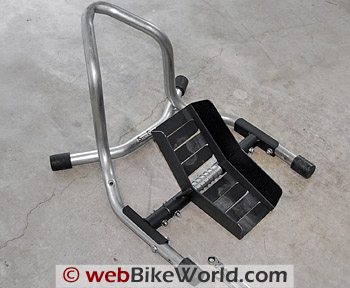
The Smart Chock is a motorcycle front wheel stand with a wheel cradle designed to automatically adjust within a specific width range to hold the front tire.
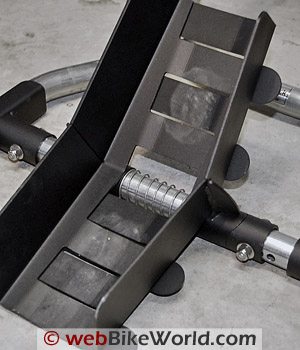
The Smart Chock motorcycle front wheel stand has an interesting feature: a self-adjusting wheel holder cradle, which consists of two metal halves with interlocking fingers.
As the motorcycle is pushed into the stand, the cradle rotates forward, and a cam on the cross bar squeezes the two sections of the cradle together, which theoretically helps to secure the tire.
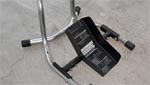
The Smart Chock
The company’s marketing material states that the device is “engineered to ‘intelligently’ grip and release your tire”.
They also say that “the big advantage of this design is that you can use one Smart Chock for many different bikes with different tires.”
This sounds good in theory, and the Smart Chock is an acceptable front wheel stand, but we’re not sure if there’s an overwhelming advantage to this design, at least for the motorcycles we used for our evaluation.
We compared the Smart Chock to the Acebikes Steady Stand (review), which doesn’t have an adjustable cradle but, still manages to hold different tire widths and diameters just as securely, if not more so, than the Smart Chock, in our opinion.
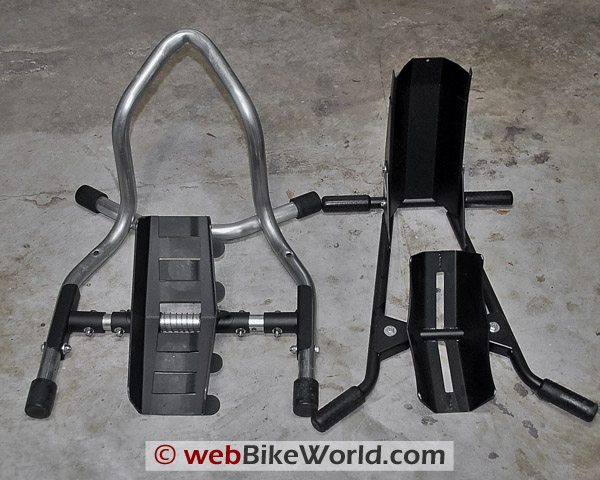
Smart Chock vs. Steady Stand
The motorcycle rolls up and on to the cradle of the Acebikes Steady Stand with less effort than it takes to push the bike into the Smart Chock.
We think part of the reason for the greater effort required for the Smart Chock is that the cross bar is approximately 1-1/2″ in diameter, compared to about 3/4″ diameter on the Acebikes Steady Stand.
We presume that the larger diameter cross bar on the Smart Chock is necessary to provide a larger bearing surface for the rotating cams.
But the larger diameter means that the wheel cradle on the Smart Chock is about twice as high as the cradle on the Steady Stand, which sits only about 3/4″ from the floor.
So it takes more effort and energy to get the motorcycle wheel up and over the added height of the Smart Chock.
Also, the smaller diameter cross bar on the Acebikes Steady Stand is located through the center of the stamped metal wheel cradle, inside the apex.
The tire rolls right over this cross bar with little effort; the tire barely touches the cross bar because the diameter of the tire is much greater than the angle of the cradle; thus, the cross bar offers almost no resistance to the tire as the bike is pushed forward into the stand.
In comparison, the cross bar on the Smart Chock is located underneath the apex of the cradle, and this design locates the bottom of the cradle at nearly twice the height of the Steady Stand.
The taller height of the Smart Chock cradle means that an increased effort is required to push the bike up on to the cradle.
Effort Required
This in and of itself wouldn’t be that much of an issue, but the extra effort seems to sometimes overwhelm the grip on our garage floor that is provided by the rubber end caps on the Smart Chock.
The end caps are designed to keep the stand in place to prevent it from slipping forward as the motorcycle is pushed in.
The four rubber end caps are round, and it’s possible that they don’t provide the surface area required to grip well enough to hold the Smart Chock steady on our garage floor.
So the combination of the extra effort needed to get the bike up and over the height of the wheel cradle can sometimes overcome the friction of the end caps, and as the bike is pushed in, the Smart Chock sometimes slides forward instead of staying put.
The manufacturer does warn that the Smart Chock shouldn’t be used on a slippery surface, and we don’t think our concrete garage floor is slippery.
Obviously, each surface will offer a different amount of grip, but we haven’t experienced a slippage problem with the Steady Stand or any other type of stand on this floor.
It’s possible that the friction of the end caps on the Smart Chock could be increased if the surface area where the rubber meets the floor was increased.
This might be done by either using longer length bumpers, or by using rubber bumpers with a square profile so the flats would lie on the floor, or perhaps by using rubber with a grippier texture.
Although the rubber ends on the Acebikes Steady Stand have a smaller diameter, they are longer than the grips on the Smart Chock.
And the rubber seems to feel “stickier”, which we think improves the grip and helps to prevent the Acebikes Steady Stand from moving as far when the bike is pushed in.
Smart Chock with cradle pushed forward; note how the cradle is collapsed, due to the movement caused by the cams on the cross bar.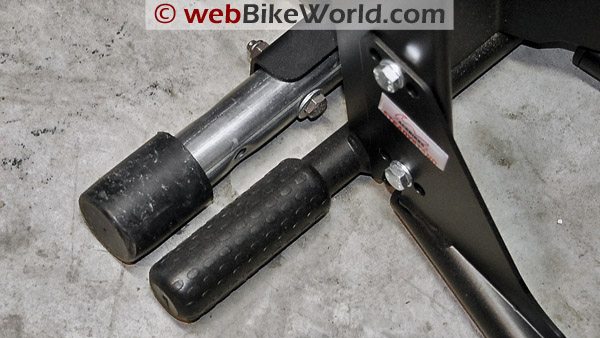 Rubber bumper on the Smart Chock (left) and Steady Stand (right).
 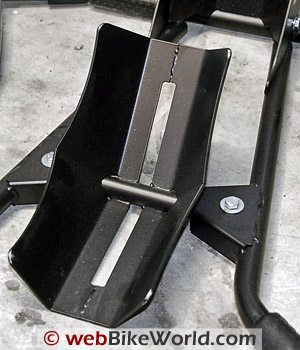 Smart Chock (left); Acebikes Steady Stand (right).
Front Wheel Cradle
The split wheel cradle on the Smart Chock has fingers that must be positioned so the two halves can move freely as the cam pushes the two halves together.
The orientation of the fingers is important to the functioning of the cradle, but we don’t think this point is described very well in the instructions; indeed — overall, our feeling is that the instructions are less clear than they could be.
We think the instructions could be improved by providing information like a detailed parts list, a description and photos of what bolts should be used in which holes, and a narrative description of how to assemble the pieces.
We also think real photos of the product in the different stages of assembly would help to make the instructions more clear, rather than the computer generated graphics that are printed on our instruction page.
Our kit did not include washers for the Nylock nuts that secure the ½” stainless steel bolts that hold the cradle assembly, although this may have been an oversight in our kit only, so we supplied our own.
We think another important piece of information should be added to the instructions regarding the positioning of the cross bar.
This would help with both the assembly of the stand and the understanding of how it works.
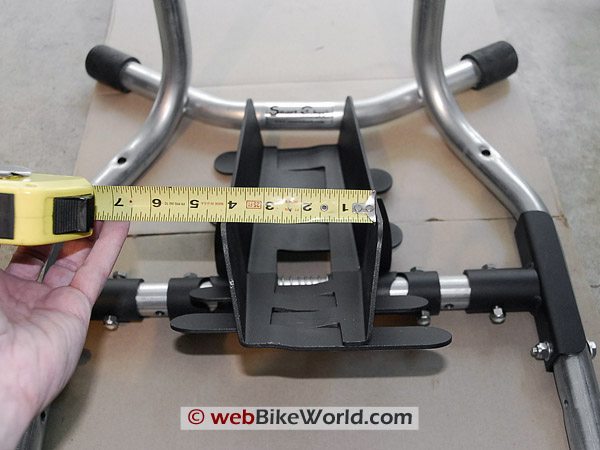
Tire Width Adjustments
The cross bar has width adjustment holes for the cams, and these holes are used to change the location of the cams to adjust the stand for different sized tires.
We think the instructions should provide some guidance to indicate which holes to use for different tire widths. It would seem useful to offer some guidance on the settings, rather than requiring the customer to use trial and error.
For example, motorcycle front tires only come in about four different width ranges.
I’d guess that the ranges encompass something like 90 to 100 mm; 100 to 120 mm; 120 to 130 mm and maybe 130 to 150 mm wide.
So it would be nice to have markings or some indication as to which width settings on the cross bar might be a good starting point for each of those ranges.
The manufacturer suggested we start with the narrowest width setting for the adjustable cradle.
This width setting was just big enough to fit the 120/60-17 front tire on the Multistrada, but we discovered that it seemed too narrow to fit the 120/70-17 front tire on the GT1000 for some reason.
Possibly the taller profile of the 70-series tire, or the different profile of the Michelin vs. the Pirelli, causes some interference between the tire and the cradle, but it’s curious that the cradle wouldn’t accommodate this small difference; this tells us that the adjustment width of the cradle is critical.
We then re-adjusted the cradle width to the next widest setting, but this seemed to be slightly too wide for the 120-series tires on both bikes.
It works, but the cam doesn’t seem to hold the cradle tight enough and the bikes seem less stable in the Smart Chock than when they are being held by the Steady Stand with its single piece cradle.
There’s movement in the two halves of the cradle if the bike is rocked back and forth (see the video above).
Adjustable for Tire Diameters
The Smart Chock also has two adjustment locations for the fore/aft position of the cross bar on the frame of the stand, which allows adjustment for different wheel diameters.
There was no guidance in the instructions to tell us which holes correspond to which tire diameters, so we guessed that the hole towards the front of the stand would work with 17” diameter Sportbike tires, and we were right.
After we finally got everything assembled and determined an optimal setting for the 120-series wide tires on both Ducatis, the Smart Chock is capable of holding the motorcycles.
However, our experience has been that the adjustable front wheel cradle doesn’t provide us an advantage over the simpler design of the Acebikes Steady Stand.
Conclusion
The Smart Chock is an interesting concept, but we’re not sure if the design provides an overwhelming advantage.
Our experience indicates that the width adjustments of the Smart Chock’s cradle seem to be critical to the function of the stand.
The cross bar in front raises the wheel cradle higher, requiring more effort to get the bike into the stand and the round rubber foot caps don’t always provide enough friction to hold the stand when the bike is pushed in.
The Smart Chock does offer an acceptable level of performance as a front wheel stand, but in our situation, with the motorcycles we used, our opinion is that it doesn’t offer the advantage that we expected.
More webBikeWorld:
| wBW Review: Smart Chock Motorcycle Front Wheel Chock | |
|---|---|
| Manufacturer: Smart Chock | List Price (2008): $249.99 |
| Colors: N/A | Made In: Canada |
| Review Date: April 2008 | |
Owner Comments and Feedback
See details on submitting comments.
From “J.H.”: “I am a trailer dealer in Vancouver British Columbia (Coast Trailers Ltd). I wanted a free standing wheel chock to place in my trailers for the motorcycle customer that needs haul their bikes.
I have been using the Smart Chock for about 8 months now in both my rental and sold trailers. The customers have been really happy with them.
I did not originally expect to sell them with-out the trailers but this is what has happened.
Word of mouth and the internet has got people calling wanting to buy just the chocks.
With the adjustable wheel sizes it is perfect for rental trailers. Many that rent the trailer have bought the chocks.
It seems that you had some trouble with setting up the wheel width and skidding the chock on the floor.
You are right that the chock tire size adjustment is critical to the proper performance of the chock. I show the rental customers how to use it and they have not had any problem getting the right size. For the other customers they only have to set it up once for their bike and they are done.
I don’t know about the skidding because my chocks are secured to the trailers, but I have not heard that it is a problem.
I just thought you might be interested to get some feedback from customers that actually use the chock. My opinion is that it is a really good quality product and built to last.
I have never seen the chock you compare the Smart Chock to so I can’t comment on it’s pros and cons. Just thought I would let you know that this chock has done the job I purchased it for.
I appreciate your sharing of information about bike products and enjoy visiting your site.”