The OZ LED Mini Trail Light set is cheap as chips at $49.50.
The 10W LEDs put out an amazing amount of light for the price; more light than we imagined.
The only problem is the mounts. There’s just one word for them: awful.
We finally got it to work — hopefully — with a liberal stuffing of JB Weld epoxy.
Let’s hope they hold up over time…
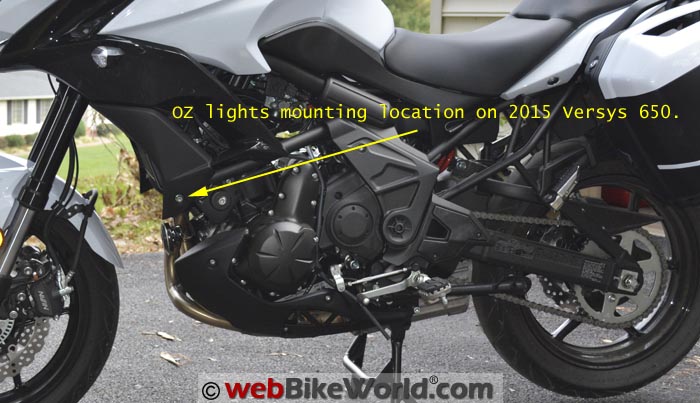
We also figured out a perfect mounting location for the lights on the 2015 Kawasaki Versys 650 LT (Blog).
Good mounting locations for the OZ lights will, of course, vary, depending on the motorcycle.
Since we’re going all-out cheap on these, we also found a dual light wiring harness with relay and an on/off switch for just $10.99.
It seems fine, although the wire lengths are designed for a car. Some splicing and dicing will fix that though.
Bottom line on the OZ Mini Trail Lights?
As long as you’re OK with what the British call “fettling”, you’ll end up with a killer set of LED lights for around 60 bucks.
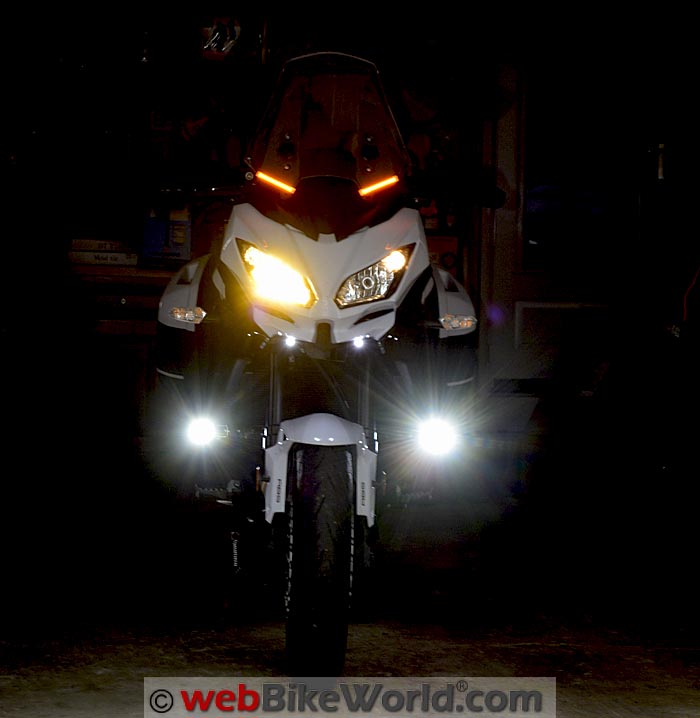
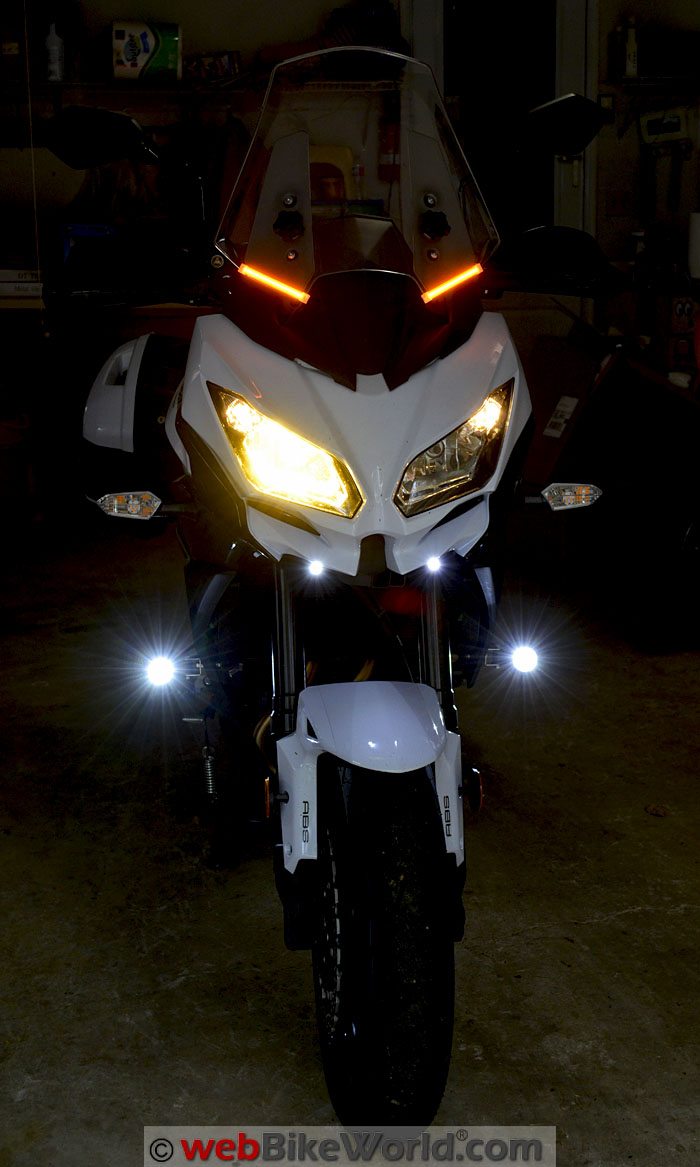
The final product, with the OZ Mini Trail Lights, the AdMore amber LED bars on the windscreen, a pair of BikeVis Bullets V2 mounted under the front fairing (with more to come) and a yellow low beam H7 headlight bulb installed. And don’t forget the very bright Inertia CAN bus LED turn signal bulbs (review) you can see peeking out of their clear covers, even though there’s no CAN bus on the Versys.Conspicuity Lights and More Lights
Let’s face it, most of the auxiliary motorcycle lights reviewed on webBikeWorld are pretty expensive, and webBikeWorld readers haven’t been shy in telling us about it.
So this time, we decided to go cheap.
Actually, the story didn’t start out that way though. Rick was looking for a set of LED visibility/conspicuity lights for the new Versys 650 project bike, not powerful driving lights or fog lights.
The idea was to find a set of lights for conspicuity that were larger and brighter than the niceBikeVis Bullets (review) but not so overwhelmingly bright that they couldn’t be used as conspicuity lights during the day.
In fact, he has a some of the new BikeVis Bullets V2 on order again, this time it’s another pair in white and a pair in the new amber color, along with the BikeVis PodMod “twinkler”.
We’ll be reviewing those soon and showing a cool way of installing them on the Versys. Maybe four Bullets will look good — 2 white and 2 amber, along with PodMod twinklers.
(Actually, you can see a pair of Bullets already mounted on the Versys in the photo above as we’re working on the upcoming review.)
And while we’re discussing conspicuity lights, you’ll also notice the bright amber AdMore LED light bars in the photo, attached to the windscreen.
These were originally designed to be mounted on the Barkbusters “Storm” hand guards (review)that he installed on the previous webBikeWorld Project Bike, the 2014 Suzuki V-Strom 1000 ABS (Blog).
However, installing those AdMore lights on the hand guards seemed like what is colloquially known as a royal PIA, so they sat in a box until we both had the bright (pun!) idea of mounting them on the Versys.
Although it would be possible to mount them on the Versys hand guards that come with the LT version, it was much easier to just stick ’em on the windscreen, spliced into a switched power line that is easily accessible in the back of the instrument panel.
The result is pretty spectacular — these babies are way brighter than either of us imagined and the slanted look actually fits with the sharp angles of the newly designed 2015 Versys. Anyway, we’ll be covering those also in an upcoming review, along with the installation of an AdMore LED brake light on the Versys.
Back to the OZ LED lights… Let’s get into a few of the details on the OZ lights and then one of our “story in photos” on how we finally got them mounted.
The OZ LED Mini Trail Lights with their “streamlined” look.Alternator Output is Important
Which brings up another Versys 650 issue: page 75 of the 2015 Versys 650 owner’s manual warns not to install any accessories where the total of all the accessories exceeds 35 Watts.
If true, this is some pretty wimpy alternator output.
Kawasaki offers an optional LED light kit for the 2015 Versys 650 that is said to be the PIAA LP270 lights (review) on a special mounting bar. They also sell a set of heated grips as an option. If you installed both, you’d be pretty much at the limit.
Versys 650 owners claim the bike actually puts out 336 Watts at 5,000 RPM (24 Amps, 14 volts at 5,000 RPM). Supposedly, an average standard load when the bike is running (lights, fuel injection, computer, fan, etc.) is around 285 Watts.
That doesn’t leave much on the Versys, maybe 50 Watts or so max?
Definitely something to consider when adding lights and any other accessories to the Versys. And this is another reason why we were looking for low-power lights.
View from the top.Which LEDs?
We searched around for some time, looking for a pair of low-Wattage LED lights that might work for added conspicuity on the Versys.
The expensive LED lights are usually too bright for conspicuity only and they draw too much power for the Versys. But if you want to spend money, the Clearwater Glenda LED lights (review)are an excellent choice. They draw 12 Watts each (24W for the pair) at full power.
They’re perfectly suited for conspicuity by using the included rheostat to keep the lights at low power. And if you crank the dial to full, they add some fill light for night riding.
If you want more photons, try the Clearwater Darla LED lights (review) or there are several different other and way more powerful Clearwater lights. But, you’ll be running into mounting issues for these heavier and much larger lights and they definitely draw too much power for the Versys.
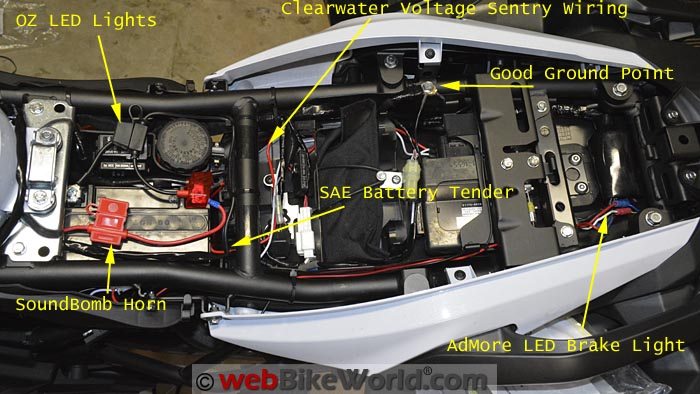
(Note: We’re also installing the latest Clearwater Voltage Sentry (review) on the Versys, which will monitor power consumption and let us know if there’s a problem and we’ll report back on that also.)
The dimmer rheostat that comes with all of the Clearwater lights can be used to dim the lights just enough to work for conspicuity, which helps lower the Watt output, at least on their smaller lights.
One more thing: although Rick figured out how to add a “poor man’s” dimmer to the Denali D4 LED lights in this review. It isn’t anywhere near as functional as the dimmer that comes with the Clearwater lights, but it does work.
The OZ Mini Trail Lights
The OZ Mini Trail Lights are actually sold by different retailers under a variety of names. We’ve seen these lights before and others that look nearly identical, sold by a bunch of different companies, so who knows where they really come from and who makes them.
Surely some factory in China is pumping them out by the bazillions and anyone can buy a case and sell them under their own brand. That’s the modern global economy for you…
OZ is a pretty popular retailer though with motorcyclists and they sell dozens of different types of auxiliary lights for motorcycles, cars, trucks, ATVs and more.
The OZ Mini Trail Lights are available as driving lights or with a fog light lens and each light supposedly draws 10 Watts and can be used with anything from 12 to 30 Volts, according to the specs. OZ claims the lights have a CREE LED with a life of “over 20,000 hours”.
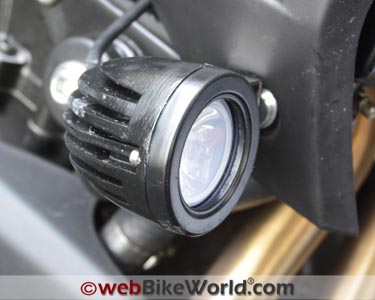
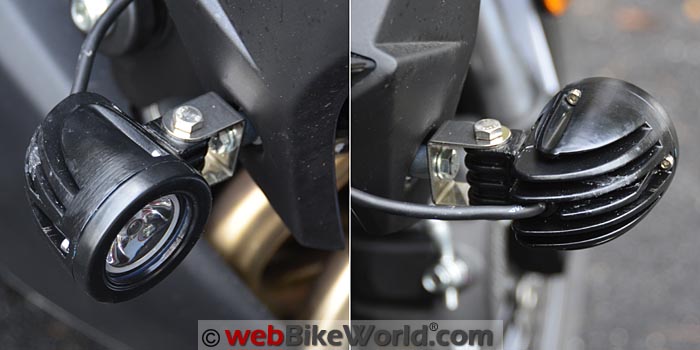
The light housing for the Mini Trail Lights is actually surprisingly hefty. It appears to be cast aluminum with a black powder coated finish that’s a bit rough in spots but serviceable.
There’s also what appears to be a waterproof gasket between the cover holding the lens and the light body. Four small diameter hex head cap screws hold the cover tight to the light body.
Each light module measures about 55 mm in diameter and they’re about 65 mm long with a 40 mm diameter reflector. The deep fins give these lights a sort of 1930’s “streamlined” shape that’s pretty cool.
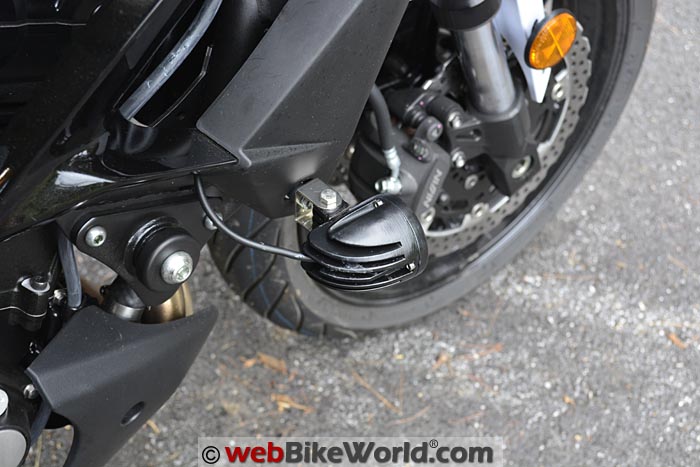
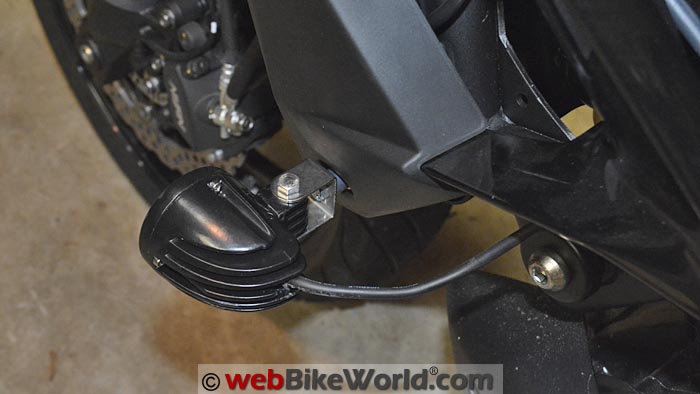
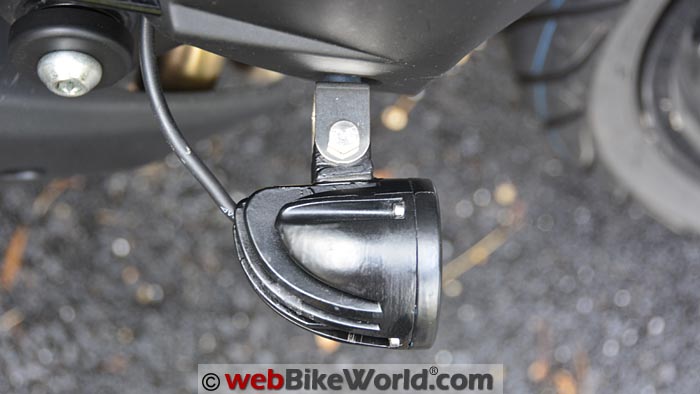
OZ Mini Trail Light mounted on left side of the Versys. Note mounting location in lower bolt hole for fairing. OZ light mounted on right side. Again, note the mounting location, perfect for mounting these lights — but you’ll need the spacer.In the Kit
The basic OZ light kit costs only $49.50 and it includes the two lights, each with a two-part wire with a waterproof (hopefully) connector. There’s a red power and black ground wire in a nice rubberized sheath.
Also included in the basic kit is a U-shaped stainless steel bracket and 4 stainless steel hex head cap screws (HHCS). Two are used for securing the light base to the U bracket and two for securing the U bracket to the bike.
For the horizontal mounting like we did on the Versys shown here, you’ll need to replace the HHCS that come with the kit with hex-head bolts, so you can hold the bolt head with an open-end wrench to fasten the U bracket to the bike.
If you use the HHCS that come with the kit, you may not be able to get an Allen wrench between the light and the head of the HHCS. Using the hex bolts really helps when it comes time to aim the lights in the vertical and horizontal planes simultaneously.
Also included in the kit are stainless steel lock washers and nuts, but we used Nord-Lock lock washers instead; see that section below.
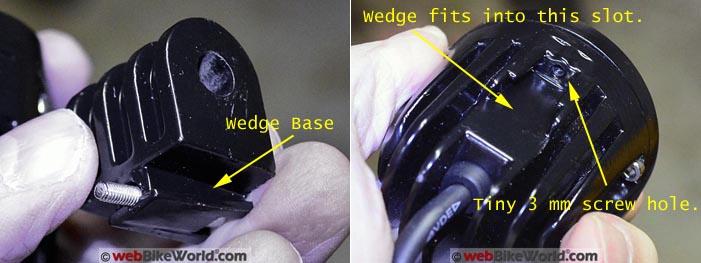
(Photo Left) This is the wedge-shaped mounting base that is separate from the light module. The wedge on the bottom does not fit correctly into the base of the OZ light modules. (R) Here’s where the wedge base above is supposed to fit. It doesn’t fit correctly, there’s too much slop and the tiny 3 mm screw won’t hold it securely. The answer? JB Weld.Break Out the JB Weld!
The biggest problem with the OZ Mini Trail Lights is with the mounting base, which is cast separate from the light housing casting for some reason. Why they didn’t cast the two together is a mystery.
The base has a wedge-shaped bottom that is supposed to slide and fit into a matching wedge-shaped recess on the bottom of the light housing.
Then you’re supposed to screw in an incredibly thin 3 mm hex-head screw and that’s supposed to hold the male wedge of the base into the female wedge receptacle on the bottom of the light.
But the threads in the light casting are so shallow that they’re likely to strip with the lightest amount of torque.
The problem is that the wedge-shaped base is smaller than the wedge-shaped receptacle, so when you put the two together, it’s much too loose in the light housing and you’ll probably never get these tight enough.
Many owners report problems with this and have complained about it in the various forums.
We noodled on this problem for some time and tried a bunch of possible solutions that I won’t bother to go into here.
We ended up sanding off as much of the powder coating as we could, then we stuffed a boatload of JB Weld into the base wedge receptacle and then attached the wedge base with the screw.
We put some lines of JB Weld along the sides and rear and everywhere we thought it might help to hold the base on the light module.
Then we put the lights under a heat lamp to dry for 48 hours. After that, a bit of sanding and a couple of coats of black satin Rustoleum and we’re in business.
The result is that the bases now seem nearly welded to the light modules, so the mounting is much stronger.
Since no matter how you mount the lights, you’ll always need to use the same base, permanently attaching the base to the lights isn’t an issue and again, something they should have done at the factory.
Probably if you’re good at aluminum welding, you could add a few spots of weld instead of the epoxy. Or maybe braze the two together?
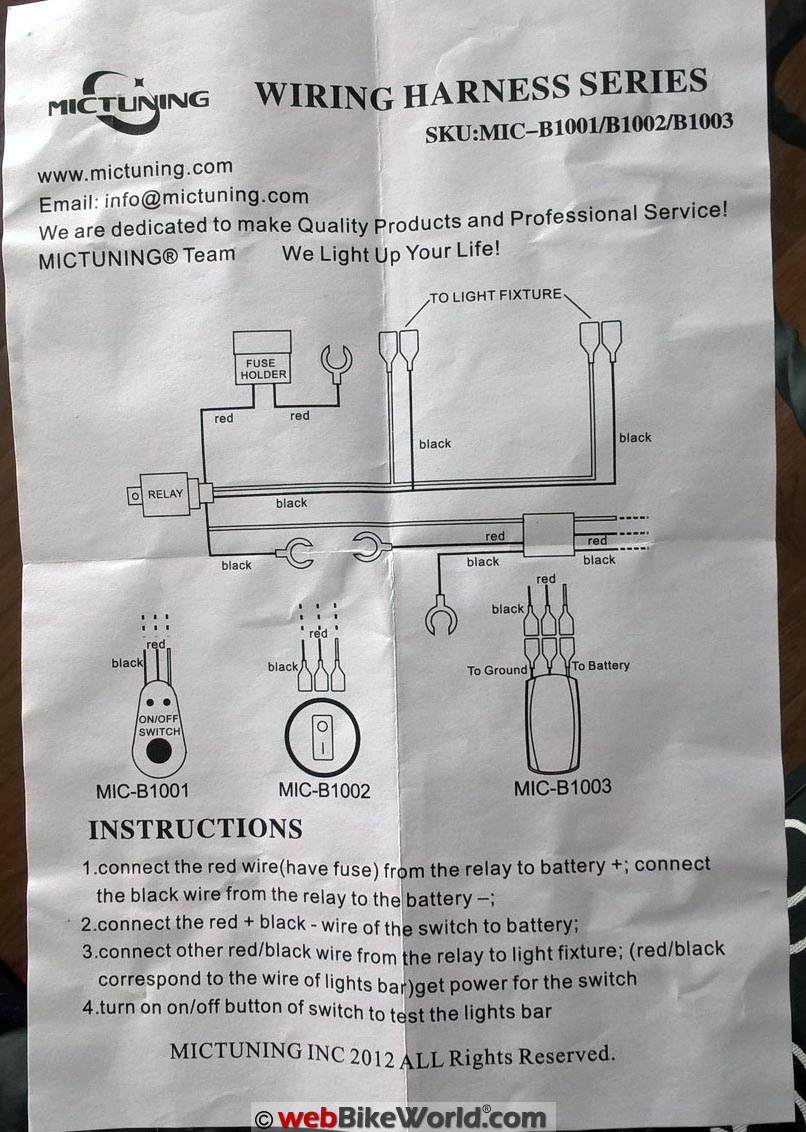
Wiring Harness
You definitely want to wire these up using a lighting wiring harness with a relay. There’s a lot of feedback from OZ Mini Trail Light owners in the forums and some of them say that they wired the OZ lights directly by simply connecting the red and black wires to a power source.
Don’t do that!
Since we were going Cheap Charlie on this one, we bought the “Mictuning” branded dual light wiring harness with relay and an on/off switch for just $10.99. It doesn’t get any cheaper than that for a wiring harness with a relay, fuse and an on/off switch.
Of course, hard-core cheapskates will want to make up their own harness using a relay and that may save a few bucks if you have the relay, connectors and wire already purchased.
UPDATE: Here is a .jpg of the wiring diagram for the Mictuning dual light wiring harness with relay and on/off switch.
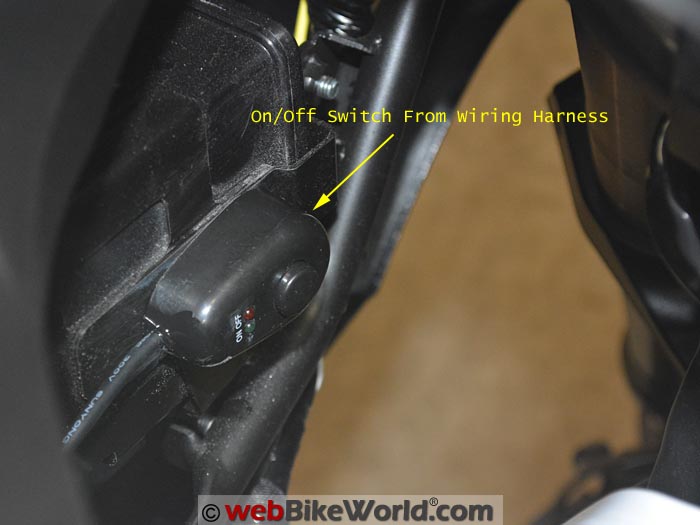
On/Off Switch
Technically, you don’t necessarily need the on/off switch. You could wire the lights to turn on with the ignition with the low beam, or wire them to turn on and off with the high beam.
As it turns out, the OZ lights are so bright, you should not run them at night with the low beam when you’re facing oncoming traffic, so you really should connect the on/off switch or wire them to go on and off with the high beams.
If you buy the Mictuning (or other) harness with the on/off switch already connected, there’s no extra work involved anyway.
The quality of the Mictuning harness seems OK; there’s nothing on it that strikes me as being so cheap as to be dangerous, although the included relay looks a bit suspect compared to the name-brand types that come with the expensive lights.
We did have to trim quite a bit of the wire though, because the Mictuning harness is designed to add auxiliary lights to Jeeps or cars.
It has 4 terminal ends for the 2 lights (two power and two ground wires) and they are covered with fairly nice water-resistant connectors, so we used those.
On the back end, we replace the massive 30W spade fuse that comes with the harness with a 5W version and then we hid the relay under the Versys’ fairing pieces on the left side.
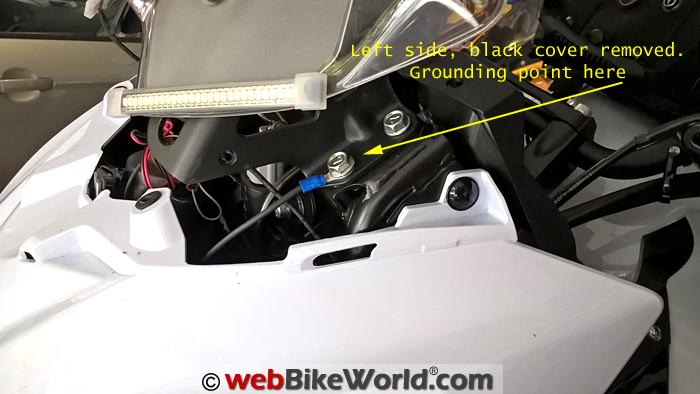
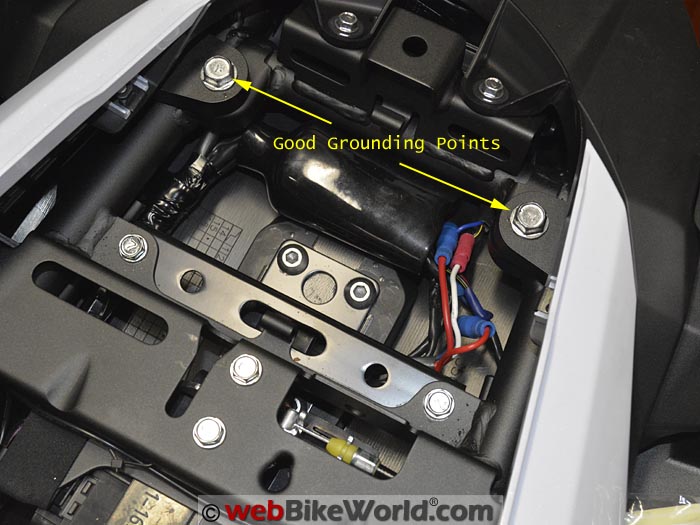
For the ground wires, see the photos; there’s a very nice bolt under the seat that works well for grounding.
Mictuning wiring harness on/off switch mounted on the Versys.Locating the On/Off Switch
There are a bunch of places you can mount the on/off switch, but the switch that came with the Mictuning harness does not appear to be waterproof.
We’ll probably do a cut-and-splice and replace it with a waterproof on/off switch at some point.
But for now, we mounted the on/off switch on the side of what appears to be the evaporative emissions box down under the handlebar inside the fairing on the left side of the Versys. It’s easily reachable with my left hand while also remaining semi-protected from the weather.
The double-sided tape on the on/off switch that came with the Mictuning harness barely had any stick to it, so we dribbled a couple of dots of Superglue on it and it stuck like…glue.
Installing the OZ Lights
As per usual, once I explain how it’s done, it will seem like installing the OZ Mini Trail Lights on the Versys is easy. But that’s only because we did all the figuring on how to get it done.
Believe me, it took us literally days before we figured this all out and were able to source the required parts. But for you, it should be a piece of cake. That’s the best part (the “value added”, in MBA-speak) of a webBikeWorld review!
The only hitch with our installation is that non-Versys owners will likely have to figure out a good way to mount them on your particular bike, but some of these tricks will certainly apply.
And by the way, the OZ lights could also be mounted down on the forks, using standoffs for the fender bolts. This is the way the Clearwater Glenda lights are mounted.
Don’t forget also: these lights don’t care about an orientation; that is, the lens is round and doesn’t have a specific mounting orientation that we could find. They work the same whether mounted vertically, horizontally or whatever, because they put out a round “cone” of light spread.
The horizontal “sideways” mounting you see in the photos works just fine. Also, rather than going the fork mount route, we wanted to get the lights higher up on the bike.
Mounting on the Versys
As it turns out, the new 2015 Versys has a nice 5 mm bolt on either side to hold the piece of lower black fairing (see photo above). It screws into a threaded attached nut on a metal frame underneath the fairing, and this is a perfect location for mounting the lights.
Believe me, it isn’t always this easy…
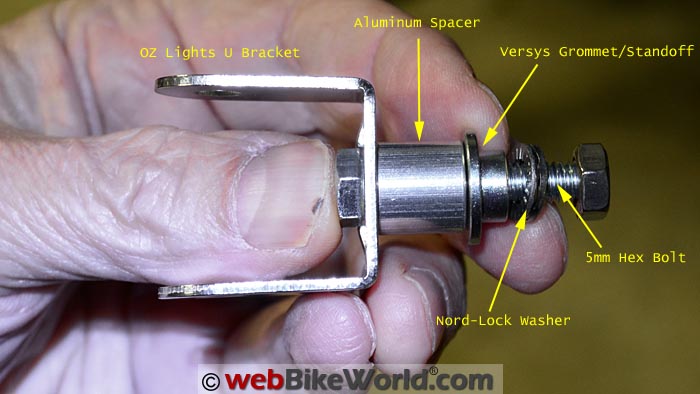
To mount the lights, you’ll first need a standoff or spacer of some type that is at least 12 mm long, which is required to clear the fairing part on the Versys with about 2 mm to spare. And you’ll need a longer 5 mm bolt to account for the additional length of the spacer.
There’s a metal grommet spacer already on the bike underneath the dome-head bolt put there by Kawasaki. The grommet prevents the plastic fairing from cracking when the bolt is tightened.
We found an aluminum spacer that is 12 mm long with a 13 mm outside diameter and a 6.1 mm inside diameter. It works perfectly on the Versys.
It is item# MAS13-6-12, available from Daven Screw Products, on the websiteAluminumSpacers.com. We bought a pack of 6 for $5.70, along with a bunch of other sizes because we weren’t sure what size would work best on the Versys.
Even if you do the fork mounted route, you’ll need a standoff spacer, so measure carefully and the AluminumSpacers.com site has hundreds of different sizes, if you can’t find one in your local hardware store (or make one yourself).
Actually, you could just stack a bunch of washers together to make the standoff, but that would look awful…
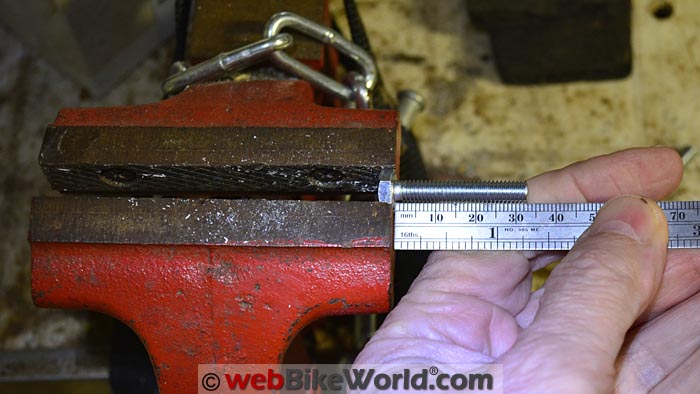
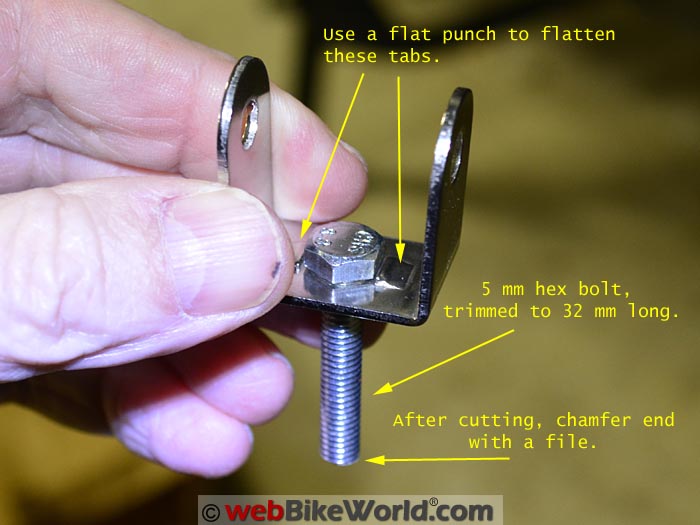
Trim the 5 mm stainless steel hex bolt to 32 mm long and chamfer the end with a file.Bolt Modifications
For mounting on the Versys, we also had to buy a couple of longer 5 mm hex bolts (stainless).
These are needed to fit the extra length through the U bracket, through the grommet standoff that Kawasaki uses to keep the plastic fairing from cracking and then with enough length to add a lock washer and bolt on the inside.
The only bolts we could find in the local hardware store were 60 mm long, so we had to trim the pair using a Dremel with a cutoff wheel.
The optimal size is 32-34 mm long (photo above), which allows enough to add a Nord-Lock washer and nut on the inside.
The kit comes with HHCS, but you’ll have to use a hex bolt instead to be able to hold it with an open-end wrench to tighten when using the side mount.U Bracket Modifications
The U bracket that comes with the OZ lights kit has two stamped indents on the inside (photo above). We’re not sure why, because the kit comes with round-headed hex head cap screws, not hex bolts.
But the raised tabs prevent the 5 mm hex bolt head from moving, which sounds good but isn’t because you may need it to turn to grab it with an open-end wrench when you’re tightening the bracket.
So, we set the U brackets on the floor and pounded the tabs flat, using a flat punch and a ball peen hammer. Wear eye protection!
The wiring harness with relay included with the PIAA LP270 light kit.Nord-Lock Lock Washers
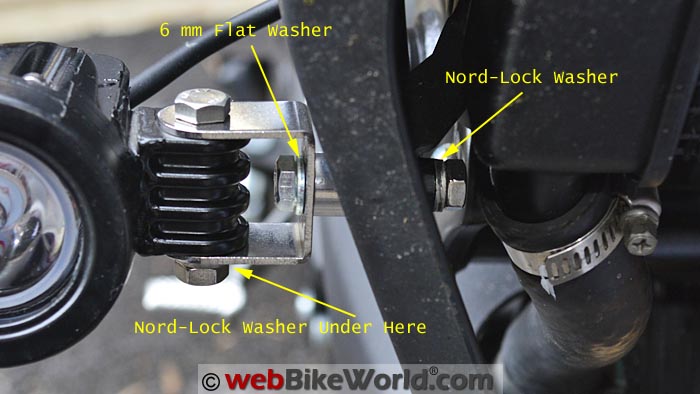
Finally, we used Nord-Lock lock washers rather than the lock washers that came in the kit. If you’re a webBikeWorld Facebook friend or webBikeWorld Google+ Community member, you know about Nord-Lock lock washers.
They’re expensive as all get-out, but they work. We proved that on the Clearwater Glenda fork mounted lights, where we used Nord-Lock on the right fork and standard lock washers along with blue Loctite on the left fork.
The right side never became loose, while the left side did constantly.
If you’re not familiar with Nord-Lock products, watch this video, which shows Nord-Lock lock washers compared to everything else in the Junkers vibration test. You’ll never use lock washers, Nylock nuts, double nuts or Loctite again:
Above: Watch this video and you’ll never use lock washers, Nylock nuts or Loctite again.
Aiming the Lights
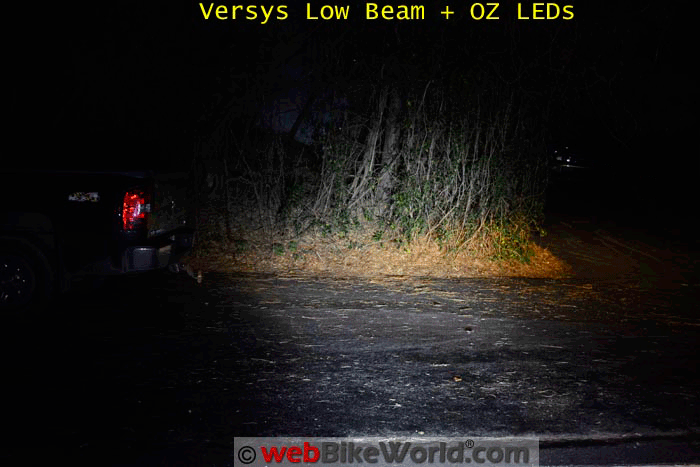
It always takes a couple-three tries to get the lights aimed properly in the vertical and horizontal planes. We tried a couple of orientations with the bolts lightly tightened and the OZ lights can really put out a surprising amount of light if aimed high.
But in this case, Rick was interested mostly in daytime conspicuity and for that, the OZ lights are still way brighter than needed.
In fact, if pointed like they normally would, they’re too bright for daytime use. They’ll dazzle oncoming traffic and can actually make the turn signals on the bike less visible, while confusing oncoming traffic as to what they’re seeing.
So we had to re-aim the lights to point lower towards the ground, aiming them to center about 15 feet in front of the bike.
They’re still pretty bright for daytime conspicuity use. But they work great at night — which is why you’ll need an on/off switch placed right up near the left hand grip in an easily accessible location. Or, wire them to turn on and off with the high beams…
Since the U brackets and provide two planes of adjustment, you’ll have to find the optimal vertical and lateral location for aiming the lights for your particular situation.
We messed around with this on a couple of nights, first by semi-tightening the nuts (not too tight or you might break the epoxy seal) to find the right location. Then tighten (not too much, because those 5 mm bolts won’t take a lot of torque) and re-check.
Do this a couple of times until you get it right, then you’ll have to re-check and possibly re-align during the day to make sure the lights aren’t too bright for oncoming traffic.
Conclusion
The OZ LED Mini Trail Lights are a fantastic deal at just $49.50 for the pair.
You’ll have to add some elbow grease to get everything mounted and situated, but in the end, you’ll get a really nice amount of light output for literally 10% of the cost of a set of more expensive lights.
See Also: Kawell Amber LED Light Bar Review
Owner Comments and Feedback
See details on submitting comments.
From “A.L.” (June 2016): “I was looking at your double headlight apparatus and I would like to bring up a safety issue with double headlights that you might want to share to anyone thinking about putting the double headlight on a motorcycle, or manufacturing one with that feature.
If there aren’t many lights around them then it is difficult to distinguish that the motorcycle is indeed a motorcycle, it could cost a life.
Let me explain by telling you what recently happened to me: I was on a rural road that I know well, and it was a summer night, very dark. I was turning left.
I could see there were small headlights in the distance approaching, but they were far enough away that I determined it to be safe to turn left. So I turned left.
Suddenly I realized that the car that I thought was far away in the the distance was actually a very close motorcycle that had two small headlights!
Thank goodness that that motorcycle wasn’t twenty feet closer, as it gave enough time for the cyclist to slow down and avoid an accident and serious injury to themselves, and saved me great angst.
I would think this would be a high priority for motorcycle safety, and for those who make those vehicles.”
Rick’s Reply: Good point, the whole idea of adding conspicuity lights to a motorcycle is to help increase visibility and make the bike appear wider to avoid situations like you describe.
We also added a Kawell amber LED light bar (review) to the Versys to hopefully assist with that.
From “M.E.” (January 2016): “Easiest way to clean cut threads is to spin a nut on before cutting. Spin the nut on, make your cut, spin the nut back up to clean the thread, file lightly, repeat as necessary, spin nut completely off, job done.”
From “B.P.” (January 2016): “That’s a fantastic review Mad Dog did of the OZ lights: thorough explanations, good tips, useful links, and nice pictures.
It turns out that a friend of mine bought a new Versys a month or so ago, and is having the dealer store it over the winter, before he actually takes delivery. I’m sure he and other Versys owners would be very interested in more information about that stated 35 Watt accessory limit.
For one thing, based on my experience (see The Minimalist’s All-Season Riding Outfit (report) and his own plans, he bought a Gerbing heated liner (and also some heated gloves).
As most liners draw about 70 watts on max setting, and gloves some lesser amount, is Kawasaki telling all those Versys owners to fuggedaboudit, regarding heated gear? That would certainly be a show-stopper for me, with respect to anything other than some backyard play bike.
When I owned a Burgman 650, I had installed a Kuryakyn LED voltmeter. I discovered that AT IDLE, with heated gear on high and auxiliary lights on, the meter showed that I was in an under-charging situation.
So I replaced a pair of 35 Watt halogen bulbs with a pair of 5 Watt LEDs, saving 60 Watts. Also, when stopped at a light, I would turn down the liner, and maybe turn off the extra lights.
As a Versys is your project bike for the year, I think you would do the Versys community a real and much appreciated service if you’d look into this issue some more, and see what the real story is, regarding excess alternator output.
Perhaps you could put an ammeter in the mix, and see what happens at different RPMs and different accessory loads. Or maybe just add a nice digital voltmeter, and run the same sort of tests, noting when the voltage drops below, say, 12.5V.”
Rick’s Reply: Thanks for the info, yes, we’re looking into this. First, we installed the latest version of the Clearwater Voltage Sentry (review), which will tell us when/if we’re going into a charging deficit. We flush-mounted the LED on the dashboard of the Versys and we’ll report on that soon.
Also, we’ll work on testing various electrical loads. The CVS has a claimed accuracy of <0.25%, compared to a dial Volt gauge, most of which are hard to read even to 10-20%.
I’ll also see if we can contact someone at Kawasaki to confirm the recommended accessory load for the Versys.