Part 2: WorldNav 3500 GPS Overview
wBW WorldNav 3500 GPS Review
▪ Part 1: Introduction and Details
▪ Part 2: WorldNav GPS 3500 Overview
▪ Part 3: Applications and Settings
▪ Part 4: Where To? WorldNav 3500 Navigation
▪ Part 5: Using the WorldNav 3500
▪ Part 6: Installation and Conclusion
▪ WorldNav 3500 GPS Owner Comments
Related wBW Reviews
▪ Motorcycle Bluetooth Intercoms
▪ Motorcycle Intercoms
▪ wBW Review Index
The WorldNav 3500 GPS Hardware
The WorldNav 3500 GPS module is very light, coming in 366 grams (13 oz.) and measuring just 112 x 91 x 47 mm (4.5 x 3.5 x 2 in.).
It is similar in size to the Garmin zumo 450 and even closer in size and looks to the TomTom Rider (review). The WorldNav 3500 GPS also includes a distinctive sun-shield molded into the outer housing.
Inside this thick casing and dominating the front is a smallish 3.5 inch (diagonal) Thin Film Transistor Liquid Crystal Display (TFT +3.5 LCD) touch screen with 320 x 240 pixels (RGB) display.
The display is encased in its own housing and then surrounded by a heavy duty outer casing with a molded sun shield.
The outer case material is non-slip and can be compressed slightly with pressure, to the unit should absorb bumps, knocks and scrapes without damage.
The front and back pieces fit together tightly and are secured by six screws. Together this provides the IP 5 (ingress of water) rating for the housing.
The only direct opening on the casing provides access to the external media card slot and mini-USB port used for charging and data communications.
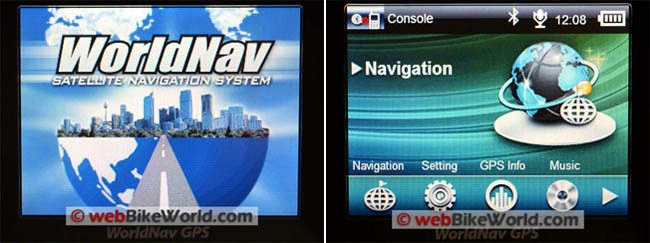
WorldNav 3500 Cycle GPS – Initial splash screen displayed on startup (L). Applications screen (R).Memory and Power
A close-fitting positive engagement hatch seals this access point. Inside the external media slot is an included (generic) 4GB Secure Digital MultiMedia Card or SDMMC card that is pre-loaded with needed software.
As such, do not format it or replace with another media card without understanding the implications and restoral requirements. The card can and should be backed up to a PC folder.
Removing the MMC is via the usual “push and release” motion.
The contact strip is oriented towards the front of the unit which puts the standard thin détente so useful for removing the card on the inside edge; care is needed so as to not exert undue pressure on the hinged hatch when removing the media card.
The small flush mounted power button is located on the top left rear of the housing and it takes a firm push to activate.
It powers the device On or when pushed again, provides the option of powering the device off or putting it in “Sleep” (standby) mode.
Out of the carrier the switch is easy to feel and activate with a bare finger, but once the device is mounted in the carrier it becomes difficult — the thick top piece of the carrier molding doesn’t provide much clearance for the switch.
When wearing gloves, the switch is very hard to use.
From the back, the power connection and thumb or twist-screw insert is centre towards the top while a small “Hot Reset” button is located on the lower right.
The usual device identification and certification stickers are found on the back as well.
The power lead is a two piece harness that uses a 2.5 mm x 10 mm coaxial connector to join the two sections. Total length of this harness is 236 cm (93 in.), which should be sufficient for fitment on virtually any motorcycle.
The shorter power harness section is 43 cm (17 in.) long and permanently attached to the GPS module by a weather-proof strain-relief housing.
The longer section is 193 cm (76 in.) long, with one end being the socket half of the connector and the other terminating in two tinned wires — one Red (positive) and one Black (negative).
With the connector in use and the threaded cap screwed into place, the juncture point is very secure and protected from the elements.
This quick-disconnect feature facilitates removal of the GPS from the carrier and the motorcycle.
A tethered soft rubber plug seals the socket end of the power lead when the system is not connected. When mounted up, the GPS is powered directly from the 12V DC harness mounted on the back of the carrier.
The device has a (non-removable) 3.7V 1000mAH battery that provides 2-3 hours of standalone runtime depending on user interaction, backlighting, etc.
The USB port on the side provides another means to power/charge the system from any compatible USB 2.0 (or better) port or with an AC-DC charger that uses the standard 5V 1.0A output.
All of the mini-USB connector chargers I have on hand work fine with the WorldNav 3500 GPS, something I can’t say for some other electronic devices…
WorldNav 3500 Cycle GPS – Main settings screen.WorldNav 3500 GPS Initial System Setup
Upon receipt of the kit, I unpacked everything, did a quick inventory, turned the GPS on and off to verify that it would power up, and then put everything away for a couple of days while satisfying the urge to ride and relax under sunny Florida skies.
I did charge both the GPS and Bluetooth modules before initializing the system using a USB 2.0 cable to trickle-charge the GPS.
I also used the provided 100-240 AC-to-DC 5V 1.0A wall charger with its 2.5 x 5 mm coaxial (barrel) plug to charge the Bluetooth headset module.
Use of the WorldNav 3500 GPS is covered between the 3500 Hardware User Guide and the WorldNav Navigation Software User Guide.
It is not hard to discern the origins of the system as there are numerous references to terms, conditions and procedures used within the commercial trucking industry as opposed to the motorcycling environment.
The Hardware User Guide covers getting started, basic operation of the device and use of all the applications and tools listed earlier, except the GPS navigation application.
Use of the main GPS application is covered specifically and extensively under the Navigation Software Guide.
More on this curious documentation division later.
And before getting too far along the evaluation path, both guides were read twice before finally cranking up the system.
Pressing the power button for two to three seconds brings up the opening WorldNav splash screen followed a few seconds later by the default Main Menu Page that displays the primary application Navigation screen.
The main screen is divided into three horizontal sections or panes.
The top pane displays icons for headset connectivity, Bluetooth if active, time in digital format, battery status, and an “X” to close or go back.
Except for the time readout, pressing any of the icons will bring up the respective configuration screen.
With the default screen activated, the centre pane displays a large icon of the selected or last used application while the bottom pane typically lists the available applications, movement through which can be done by using the left or right cursor.
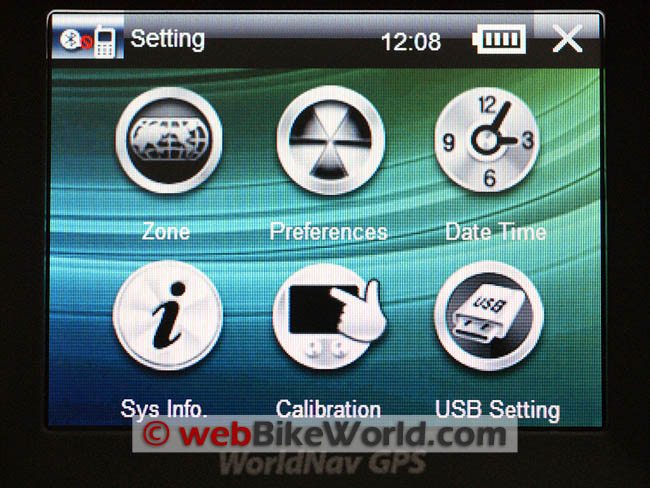
Setting some basic user preferences is a good way to get familiar with the configuration tools. Touching the “Setting” icon on the lower pane brings up the Setting menu, one of the best starting points.
Preferences and Settings
The main Setting screen displays six icons:
- Zone: Allows time zone setup and changes.
- Preferences: Brings up four smaller preference icons on bottom line for language, backlight, power settings and sound settings.
- Date and Time: Clock and calendar settings.
- Sys Info: Software, flash memory and device ID; Calibration – of the touch-screen.
- USB Setting: Charging or online (data) mode.
From this point, the user can start to tailor the WorldNav 3500 system to meet individual requirements before diving into the other applications, which are all covered in more detail under Parts Three and Four of this review.
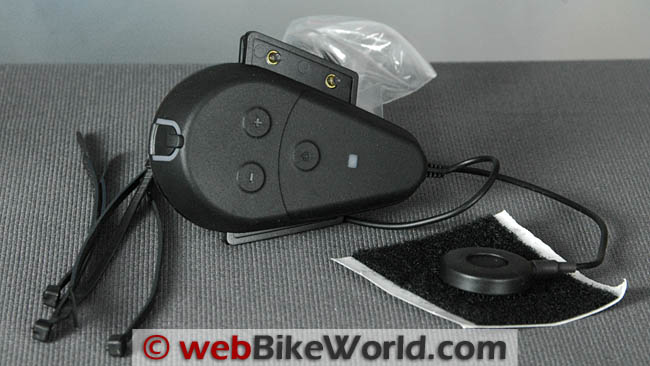
The WorldNav 3500 Motorcycle GPS helmet Bluetooth receiver and speaker is required to hear spoken GPS instructions, a distinct disadvantage of the WorldNav system.WorldNav 3500 Bluetooth Headset
The WorldNav 3500 Bluetooth headset module has a shape similar to an early Cardo system headset.
It is a very simple device, with only three controls and a single helmet-mountable speaker (mono). Intended as an audio receiver only, the headset does not include a microphone.
The headset is specifically configured to work with the WorldNav 3500 GPS only and it is very much a proprietary component.
The WorldNav 3500 will not stream audio to a motorcycle intercom system, so if audio instructions from the WorldNav 3500 GPS are desired, the WorldNav headset must be used.
The WorldNav 3500 can still be used as a standalone GPS without audio if the proprietary headset is not used.
The proprietary audio function is a distinct disadvantage of using the WorldNav system, because anyone with a motorcycle intercom is probably not going to be interested in attaching a second, somewhat large, mono headset to the helmet to hear GPS instructions.
However, for motorcyclists who don’t use an intercom but want spoken GPS instructions and the other audio functions of the WorldNav 3500, this may be a solution.
The charging port for the headset is a 2.5 mm coaxial socket sunk well into the back of the module, protected by a recessed plug cap. The module attaches clamp-styl; two small Phillips-head screws secure the clamp pieces.
No adhesive mount is provided, although it wouldn’t take much to create something if needed for a specific helmet application.
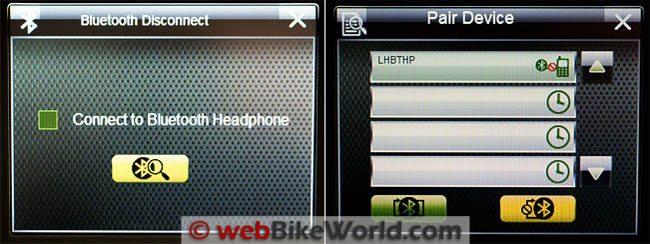
The WorldNav 3500 Bluetooth pairing and information screens.WorldNav 3500 Motorcycle GPS – Bluetooth Configuration
To configure the Bluetooth connection, use the right-hand arrow to scroll through the main application icons displayed along the bottom and then select “Bluetooth”, which launches the Bluetooth tool application screen.
Before going any further with this configuration activity, turn on the Bluetooth headset receiver by holding the centre power button down for three seconds — the Green LED will begin to flash very rapidly.
Tap the “Bluetooth Search” icon on the screen. A new “Pair Device” screen will come up with four device lines and two icons — “Connect” and “Disconnect” — along the bottom segment of the screen.
Pairing with the headset initially took about 15 seconds at which time the Green LED flashes slowly a few times during negotiation.
With the device found the top device row on the screen shows “LHBTHP”, the identifier for the WorldNav 3500 Bluetooth helmet receiver. Tap on the displayed device line and then press the Connect icon on the left bottom.
Once pairing is confirmed a few seconds later, the LED on the receiver will be steady Green indicating a connection. This completes the Bluetooth pairing and receiver setup.
To disconnect, press the bottom right side “break connection” icon.
A disconnection tone will be heard in the receiver’s earpiece and the screen will show a small disconnected symbol on the device line.
Note that unless you physically separate the two devices beyond effective range or shut one of the devices down, the link will be automatically restored.
Outside of going through the other application screens to customize the system to individual preferences, including time, units of measurement, etc., there isn’t much more that needs to be done to get the system ready for basic use.
Part 3: Applications and Settings
WorldNav 3500 Review Index
Owner Comments and Feedback
See details on submitting comments.
Comments and feedback are located in Part 1: WorldNav 3500 GPS Review