Garmin zūmo 660 Installation
This final part of the Garmin zūmo 660 evaluation covers basic installation of the navigation system on two Beemers in the home fleet.
This includes a 2009 BMW R1200R and my 2009 BMW F800GS that is the designated test mule.
With the unit updated to the current baseline and initial static testing underway, it was time to get the system mounted on a motorcycle.
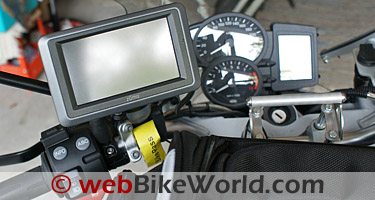
The Touratech mount ordered for installing the zūmo 660 on the F800GS was still en-route, so the R1200R serves as the initial platform.
The first step is to get the necessary pieces from the kit — the zūmo, the mount or cradle with its main harness, the RAM AMPS four-point base plate and the small bag of hardware ready.
The base plate is attached to the cradle with four M4 x 40mm pan-head screws, inserted from the front through the washers, cradle, plastic spacers and finally the base plate.
A small 8 mm open or close-end wrench for the self-locking nuts and a Phillips head screwdriver is needed to tighten up (not torque) the four fasteners; snug is good enough here.
I removed the right side trim and injector covers to facilitate access.
The thick multi-lead harness got routed down along the left handlebar main wiring/braided clutch line, behind the headlight and across some main wiring to the inside right curve of the fuel tank.
A couple of nylon ties serve to secure the harness to a previously installed power lead that runs back along the top of the air intake snorkel.
With a bit of free play maintained at the mounting point and along its route, the harness is just long enough – the connectors end up right next to the battery.
Not needing the stereo, microphone or traffic connectors right away, they got taped up and secured as a bundle to an adjacent right side frame tube.
With a Centech installation pending to clean up the growing nest of wiring under the seat, the simple route is taken for now.
Disconnect the battery — negative first, then the positive — crimp two small open connectors to the positive and negative wires of the power lead and connect them directly to the battery terminals — positive first, negative last.
The penultimate step is to use the RAM medium double-socket arm to mount the zūmo cradle to the handlebar RAM ball mount.
The final step is to place the bottom edge of the GPS in the bottom step of the cradle and with gentle backwards pressure snap the unit into the top latch.
To release the GPS, simply push the small latch on the top right side.
There is no security key lock mechanism for the zūmo 660 as provided on the original zūmo 550 cradle.
While the small and somewhat finicky zūmo 550 locking (security) screw could be a pain to use, the absence of any security mechanism on the zūmo 660 is puzzling.
I know many users keep the GPS with them at all times, but for many others, myself included, I don’t want to dismount the GPS at every stop.
The very simple and straightforward design of the stock zūmo 660 mount pretty much precludes adding a secondary locking mechanism without adding to its size and complexity, but still…
As positioned on the left half of the handlebar, the whole system is clearly visible and easily accessed by the left hand, as it should be.
Once the Touratech cradle is received, the option to mount it on the Touratech brackets installed on the handlebar clamps will be provided, but that is down the road.
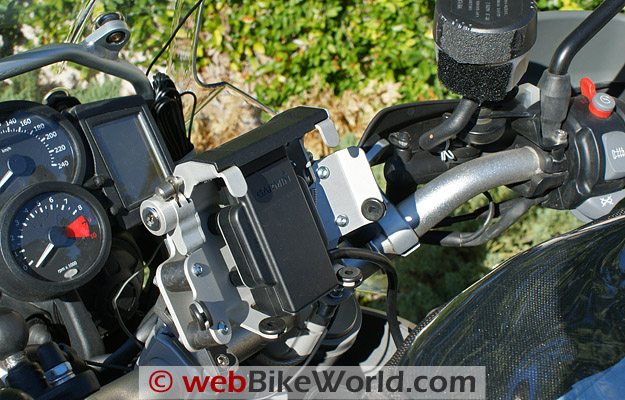
Touratech Garmin GPS mount.BMW F800GS Installation
The desired security is provided with the Touratech handlebar mounting (cradle) kit (PN 01-065-0520-0) that finally showed up.
But as I found out the Touratech kit does not include the Garmin cradle bracket/harness assembly.
And lastly, there was going to be an issue in mounting the Touratech zūmo 660 handlebar assembly on the F800GS handlebar brackets…sigh.
Fortunately for me, Garmin had just released the needed accessory kits and they were available online from the vendor from whom I had purchased the zūmo 660. The pivot bar was going to be another issue.
Three days later two of the accessory kits (Garmin PN 010-11270-03) were on hand.
This Garmin accessory kit provides the original equipment bracket with its integrated harness.
For installation purposes I had also ordered two RAM AMPS bases (RAM PN 178U-A) that come with a small bag of mounting hardware. For multiple motorcycle installations, these two kits are a cost-effective solution.
With the Touratech handlebar mounting brackets remaining in place, the well travelled Navigator III+ unit got removed to make space for the new kid on the block.
This doesn’t take long. Release the 2820 GPS unit from the BMW cradle, disconnect the power and BMW cradle leads, remove the two end bolts that hold the Touratech 12 mm mounting (pivot) bar in place and finally, secure all the bits ‘n’ pieces in a marked plastic bag before putting it on the shelf.
The Touratech instructions are quite basic, thankfully as the pictures are really poor.
Even though the steps needed to put the two kits together are simple, it took longer than anticipated to get the component sandwich completed. Cheating is allowed here — some light edging tape keeps the four screws in place from the front while adding the small washers and nuts through the back cutouts.
With the little things now assembled and nothing left over, the pieces form a complete assembly.
Accordingly, it is now time to run the main harness. With the 800s dummy panel removed, the routing and connection activities take only a few minutes. A pending F800GS farkling submission will provide more detail.
After coming up with a workaround to the pivot bar issue, the Touratech handlebar assembly with the zūmo 660 mount securely held in place was installed between the Touratech bracket set that resides on the handlebar clamps.
With some angle tuning done for visibility purposes, it all got tightened up.
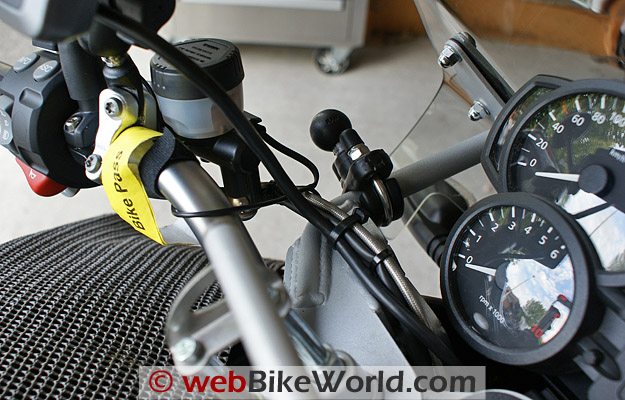
Everything else off the main harness — the 3.5mm stereo output connector, the 2.5mm microphone input connector and the mini-USB connector leads were run between the handlebar clamps and along the edge of the dummy panel up to the tank bag.
I use small plastic adhesive wire guides (Radio Shack or some hardware stores) for routing enforcement.
With the traffic connector taped up for now, the other two connectors will be used as interfaces to whatever communications system is on-board.
This works out well; it means there are no other cables, outside of the main harness, needed for the zūmo 660.
Everything done to get the zūmo 660 ready and installed on the F800GS will be documented for a (planned) farkling follow-up on the F800GS, along with an owner assessment follow-up as well.
| Garmin zūmo 660 Review: | |
| ▪ 1: Introduction to the the zūmo 660 | |
| ▪ 2: Physical Tour | |
| ▪ 3: Where To? | |
| ▪ 4: Using the zūmo 660 | |
| ▪ 5: zūmo 660 Specifications | |
| ▪ 6: zūmo 550 vs. 660 Comparison | |
| ▪ 7: Installation | |
| ▪ Owner Comments (On Page 1) | |
Other WebBikeWorld GPS Posts